Fold A4 Into A Letter

Fold A4 Into A Letter. Start with the white side or writing side of your paper facing up. Most people did this either by folding a separate piece of paper or by writing on the front of the paper and leaving the back blank to fold into an envelope.

How to Fold an Envelope • The Crafty Mummy
How to Fold an Envelope • The Crafty Mummy from thecraftymummy.com

Step 1 the spruce / chrissy pk 1. Fold in half with the long side on top, fold in half left to right and then unfold. Start with letter sized (or a4) sheet of paper.

Read more

How To Divide A Rectangle Paper Into Quarters

How To Divide A Rectangle Paper Into Quarters. Draw three lines parallel to one of the. Fold twice to obtain quarter markings at the paper bottom.

Design tips for a killer presentation IheartAnthony's Research
Design tips for a killer presentation IheartAnthony's Research from research.iheartanthony.com

Here's an easy way to fold any rectangle of paper into a triangle with three sides the same length. Place the left end of the ruler at the left edge of the sheet of paper. She split the larger rectangle into four smaller rectangles.

Read more

Fold A Gift Cards Into A Boxes

Fold the box into shape no glue or tape required for the box. I cut the back of the card into a slightly smaller square for the box bottom.


20 Quick And Easy Origami Box Folding Instructions Ideas In 2021 Origami Gift Box Origami Box Origami Gifts

This creates the glue tabs needed to assemble the box.

Fold a gift cards into a boxes. Repeat for the other side. You can also use staples or tape. Fold the cardboard into a box shape.

Work from the blank side of the card which will be the inside of your box. I already had a stash for the first year. Apply a generous amount of glue stick to the center short side of the card.

I would select cards whose fronts had a design or picture that would show up on the top of the box when folded. You can use a dab of glue to help hold the folds in place but its not essential. Using the back of the card as a guide cut the front of the card into a square that is slightly bigger than the back.

In under an hour our small group had created a cute collection of under-the-tree-worthy gift boxesperfect for jewelry cash gifts and all the other small presents your heart desires. 7 x 10 White Greeting Card Box Card Blank Comes flat packed for home assembly. Fold the 2 small flaps in and place the large flap over them.

Turn old Holiday cards into a great little gift box. 5 out of 5 stars. This will hold the box into place.

Box Size 7 x 10 x 30mm Deep Made from 300gsm white boxboard. I cut the cards fronts into the square needed for the box top. This video will show you step by step how to turn old holiday cards into usable gift boxes.

Each box only takes one card and less than fifteen minutes to make. First fold the two corners without cuts into. This video tutorial will show you how to make this playing card gift box fold after fold.

Follow the same instructions for both the box bottom and box top lid. Fold and cut the BACK to make a square. Fold a coordinating twin and In just minutes you have the perfect little box for holding treasures of all sorts Crafty Friends.

Want to master Microsoft Excel. Next cut into your card template where indicated on the pattern by the green lines. I used to make these with my grandmother.

So get out that deck of cards count out 21 of them and start bending and folding for the perfect card gift box. Start with the back of the card. Written instructions can be found here.

7 x 10 White Greeting Card Box Card Blank. Fold in the Corners Without Cuts Now youre ready to fold your paper gift box. Fold all points to center and crease well.

How to fold old greeting cards into gift boxes. Fold the two sides in and bring the flap with the glue around the outside and fold the flap over to the inside. Begin by folding the four corner triangles outwards so youre folding toward the printed side of the card.

Be sure the glue tabs are on the inside. Fold-up Favor Gift boxes 3 x 3 x 3 Cube. Download and print our free template and get folding.

Use your fingers to hold it in place until it sets. Origami a Christmas card gift box. Its time to start folding.

Repeat for opposite side. Glue the tabs to the sides of the box with a good craft glue. Your box is done.

Read more

How To Cut A Triangle Into Thirds

IXL is easy online learning designed for busy parents. What is the least amount of line needed to do this if the quarters are in one piece.


Isosceles Triangle Unit Origami Ball Origami Diagrams Origami

Angle the ruler so that the 0 point falls on the mid-line.

How to cut a triangle into thirds. Use the lines on this figure to show how the pattern of triangles can be used to divide the square into two halves three thirds six sixths and nine ninths. Repeat steps 3 and 4 to get the location of a new cut and get the other 13. Youll get 6 pieces of equal mass.

Start with an equilateral triangle. The triangle is drawn on a card sheet. Use the lines on this figure to show how the pattern of triangles can be used to divide the square into two halves three thirds six sixths and nine ninths.

Fold the pizza in half inside the box then fold each end to touch and form the almost third portion. Cut from C to O. I saw this on my feed just now and I decided to answer this.

Start with a triangle with unit sides ABC. Use the compass to divide it into 3 segments. That leaves trapezium HEFG that has not been coloured yet.

Here is a triangle a scalene triangle where none of the three sides are equal. Take your ruler and lay the point of the measurement on the bottom corner of the square. Now AOB is equilateral triangle so the angle AOB is 60 degrees.

Try fashioning an equilateral all 3 sides of the same lenght triangle with the dough. If it is an equilateral triangle draw a line from eachcorner towards the centre of the opposite side but stop where thelines. More lines are needed to divide it into four quarters.

Colour triangle AEH blue. Master triangle maths and 3000 other basic maths skills. Since the AOC angle is 120 degrees so the AOC sector of a cake is exactly 13 of it.

More lines are needed to divide it into four quarters. Starting from a single triangle Ill show you how to cut it up into pieces rearrange those pieces and get this. Repeat the same operation from B in the same direction to get the new point C.

The area of the black triangle is then 12c1-c² the hypotenuse is a radius of the circle and so has length 1. The white sector has area 12π2 – θ. 5 Draw a line with the ruler and pencil.

IXL is easy online learning designed for busy parents. Divide it into four similar trapeziums. Draw a line from the start point heading somewhat upwards.

The blue triangle has sides twice as long as the red and yellow ones. Make sure it is level height needs to be uniform. This can be accomplished by finding the midpoint of any side of the triangle and constucting the segment from them to the opposite vertex.

Another way to divide a triangle into three triangles of equal area is to. The two possibilities can be seen below. Master triangle maths and 3000 other basic maths skills.

Divide a triangle into 3 equal parts. Divide each side into thirds so the sides are ADEB BFGC CHIA. Heres how it works.

Here we cut a line into 3 segments but the same approach can be used to cut a line into any number of segments. Age 7 to 11. I have not seen the other answers BTW.

Ad Were here to support your family. Then simply cut the dough in half from each angle of the triangle so 3 cuts. For that we would have to go to Monskys theorem named after.

Use the compass to divide it into 3 segments. Use the compass to create a parallel line heading backwards and down from the end point. If one means dividing a square into three triangles of equal area the answer is NO.

Ad Were here to support your family. The pizza is now 4 slices thick Place the flat edge of a long knife on the edges of the box to ensure the knife remains in a straight line and slide across to cut the pizza at the point between the second and third. Mark off each edge into thirds and connect those points with lines using this pattern.

Now can you remove the triangle from.

Read more

How To Fold Money Into A Shirt And Pants

Fold both of the sides into the middle crease from the first fold. Then use the belt to tie the trousers and shirt together.


Pin By Vincent Lee On Money Dollar Origami Pictures For Sale Money Origami Origami Shirt Dollar Bill Origami

How to Make An Origami Shirt from Money.

How to fold money into a shirt and pants. A Fun Waste Of Champagne. This dollar origami craft is easy and perfect for Fathers Day. At the same end fold the corners into the middle line that is made by the two folds.

According to Organized 31 the traditional money lei is made up of fifty or more dollar bills. Unfold the dollar. Use colored ribbon and beads to customize this lei with your schools colors and make simple origami flowers to decorate it.

The button is attached to the wire that holds the dollars together as well has the bead head and halo. Valley fold about as evenly as possible. But you can always make her a money heart origami.

The flower and bow are glued to a button. This will be the collar. Take the opposite side of where we were working on earlier and bring it over.

Folding both ways will help in the next step. Make belt folding a bill into a really skinny rectangle. It helps me to reference where the placement should be by creasing where the raw edge that divides the O and the F of OF PICTURE 2 Flip the Section over again- making sure this edge is just a little below the flaps mentioned.

Pg 1 2 photo photo diagrams J Tucker Versatile Earrings F Temko 16 Bracelet E Strand. Learning to fold this pair of dollar bill origami pants is easy and quick with this money origami folding tutorial. Each wing is a dollar and the gown is one dollar.

See more ideas about folding money money origami money gift. Watch this origami dollar bill tutorial to learn how to fold a shirt and pants. This tutorial will show you how to fold a money origami suit or shirt and pants.

This one is too cute to ignore. Spend your spare dollar on some creativity. And you will end up with a cute origami figurine.

When folded in half take each corner near the center of the bill and fold to the first crease that we made down the middle. Page 1 2 3 Shirt. Fold the bill again from top to bottom to create another crease.

The simple trousers are super easy to fold and look like this. Fold the Bill in Half and Crease the Corners. Turn the dollar bill so its vertical in front of you and George Washingtons head is facing sideways.

2 With the front of the bill facing down fold each long edge to the center of the bill. Open the dollar bill again. Fold Right Side Over to the OF.

Origami Angel made with 3 one dollar bills. Learn how to make a shirt from a dollar bill with this origami tutorial with step by step instructions. Fold dollar bills into a Shamrock Dollar Bill.

You cant really pull off your heart to give to that someone special right. How easy dollars money origami. Fold bill in half lengthwise across the face of the bill and then unfold with the head facing up.

Also shown is the money origami shirt with necktie Step 1 Fold the bill in half lengthwise and unfold again. Make a 90-degree fold at the base of the triangle folding the point of the triangle downward toward the front of the bill and securing the legs. Easy Variation If youre planning on mounting the pants with the shirt and not having the pants stand alone in any way you can also use this very quick and easy fold to simulate a pair of pants that can be tucked beneath the bottom of the shirt.

All you need is a dollar bill and some origami folding skills. You can cut that number down if youd like but we say the more the merrier. Turn the dollar bill over and fold down the white part at the side near the edge.

Money Lei Tutorial with Ribbon Lei from Organized 31. Folding dollar origami is fun to learn and these dollar bill pants are a great companion to the origami dollar bill shirt and tie. Dollar bill origami is fun simple cute.

Fold a bill into a pair of pants. Origami dollar bill shirts and pants. To make trousers fold a bill in half lengthwise twice to make a skinny rectangle then folder in half to make two legs.

Sep 3 2013 – Explore Joni Timberlins board Folding money into shapes followed by 319 people on Pinterest. Fold the dollar bill in half from top to bottom to create a crease.

Read more

Divide A Paper Into 12 Horizonataly

Believe it or not there are many ways to fold a paper into thirds but some give more precise results than others. That way exactly two A3s can be combined to form A2 or one A3 can be folded in halves of size A4.


How To Make Horizontal Ikea Shelf Dividers Ikea Craft Room Ikea Craft Storage Ikea Crafts

For example a 12 pages document needs to be split in two first part should have first 3 pages and the second part the remaining 9 pages.

Divide a paper into 12 horizonataly. Given a paper of size A x B. It is accomplished by drawing lines between intersections or corners on the frame or through intersections of. Upload your file and transform it.

Dividing a pie into two parts is easy. This is your actual document where you put all of your text etc. Use a table to split the page hide the grid lines setup your page then copy and paste it into the other 3 sections.

Cut the pie down the middle either horizontally or vertically. 3 squares of size 12×12 2 squares of size 18×18 Input. Connect the ends of the left side diagonals.

Separate one page or a whole set for easy conversion into independent PDF files. 36 x 30 Output. Reference Finder This program creates a folding sequence to locate any point on the paper.

20cm x 20cm origami paperКак разделить лист на три части. First you produce a document with a small paper size and then you produce another document that combines these small pages onto one A4 landscape page. It should have 8 columns.

Task is to cut the paper into squares of any size. Cutting a pie with mathematical precision into five equal pieces can be done in three ways. Note that a standard 8 12 11 inch 279 cm Step 2 Roll the paper into.

You might have to adapt the margins page numbers etc. How to Trisect an angle. Find the minimum number of squares that can be cut from the paper.

Try this method if you dont need to be exact its quick and it works well but rarely will your results be perfect. Add a dotted diagonal back from the lower right corner. 1 squares of size 4×4 4 squares of size 1×1.

Step 1 Start with your paper flat on your work area. Click a cell in your table where you want to split from and in the Table Tools tab click Layout Split Table see screenshot. How to visually select PDF pages to split at.

How to fold angles of 30 and 60 degrees. Right now I need to make a page with several different sections a lot like the ad-pages of regular newspapers but dont have the faintest idea of where to start getting this to work. 4 x 5 Output.

Split an image in smaller pieces. It consists of two steps. Bend the paper in the Z-shape as you would want it to fold but without creasing yet gently push the edges top of paper and 23rds down on the left 13rd down and bottom on the right together so the edges align automatically while at the same time making the pile flatter and finally press the edges.

A non-mathematical but quick way which I used when I had to mail hundreds of letters years ago. Or drop PDF here. You can treat each page just as if it were a real page with page borders columns headerfooter columns etc.

And the table has been split into two tables horizontally as following screenshot shown. The default orientation is portrait and the 2 pages per sheet option gives you two landscape half pages that will print on the same sheet. Laws of the seven Rs.

Fold again in half vertically a third time. My main problem is that I want to make the horizontal. I am the editor of a student-paper for mathematicians and physicists which is made entirely through LaTeX.

You want to split the document at certain pages. Similarly easy is creating four equal portions. Split an image horizontally vertically or both.

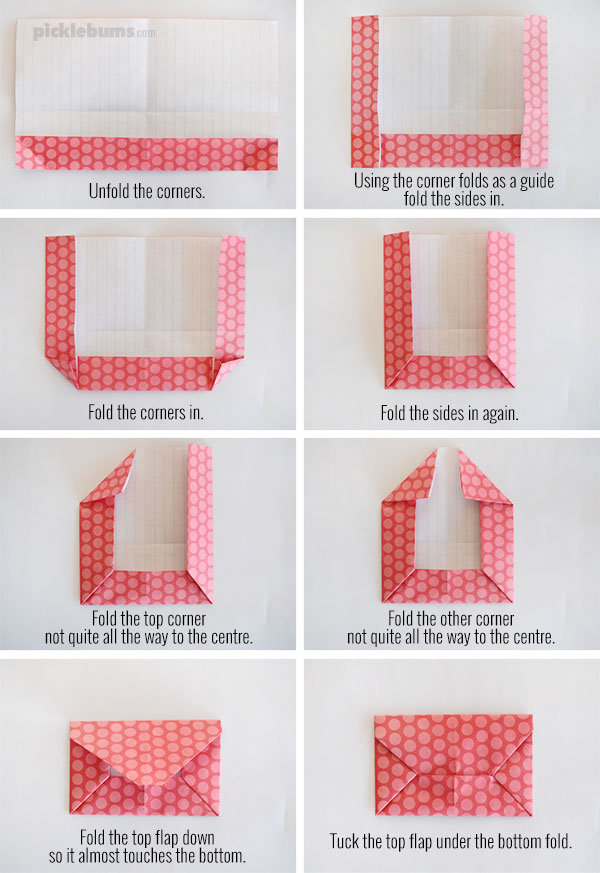
Divide into equal parts Below are pattern sequences that can be used to split a square or rectangle into an exact number of equally sized parts without doing any measurements at all. Fold a paper in half vertically. How to divide the paper into 3 equal partsorigamiMy paper.

How to Quintisect an angle. To split table to more tables you just need to. Cut down the center both vertically and horizontally.

Since the square root of two is irrational it will never divide evenly into squares. The next screen should display all pages in the document. Divide Word documents into sections using horizontal lines A great way to make your Word document easier to read and more visually appealing is to separate sections in.

On the plus side you wont need any tools for this method. You can get approximate squares by folding it into a 3×2 grid or 7×5 or 17×12 or 41×29 etc tyrion Apr 23 2010. Draw a diagonal back from the left lower corner.

You can choose the sizes andor quantity of the images being generated. Learn how to draw a circle and split it into three easy sections real easy with Shoo Rayner the author of Everyone Can Draw – the book that teaches you how. How to divide a square into Sevenths PDF Darren Scott.

Always always do the right thing for the right reason at the right time with the right people. Choose Select pages to split.

Read more

Fold Dollar Into Ring

With this guide youll learn how to make a heart-shaped money ring from a dollar bill with origami the traditional art of Japanese paper folding. A bit of bling for your finger.


Diy Art How To Make A Dollar Finger Ring Make A Ring Out Of A Dollar Origami Dollar Ring Youtube In 2021 Dollar Origami How To Make Rings Dollar Bill Origami

Open the number one and place the extra part of the bill on top of the ring then put the edge of the one over the part that you just folded over Add Tip Ask Question Comment Download Step 14.

Fold dollar into ring. Like this Video. You can use something like a pen or a pencil and your fingernail to tuck the last flap into the top of the ring tightly. You can of course use plain paper as well to make a ring.

Fold a shirt with necktie all from a single bill. Fold the flap through the ring as tightly as you can. Origami Shirt and Tie.

We know this origami dollar bill ring has been done zillions of times but its always a cool trick to do to pass the time or to impress the girl youre crushing on with some bling This is the classic dollar bill ring. Fold that vertical section down slipping it behind the flap with the 1. Dollar Bill Ring.

Here is a cool way to fold a dollar bill into a ring. Fold the two flaps in that where on the T shaped dollar so it looks like this. ESTIMATED TIME TO FOLD.

How can you flex harder than wearing actual money as an accessory. For more information including a step-by-step overview of the folding process as well as to get started making your own cardioid money rings stars watch this free origami lesson. You may have to hold the flaps down Ask Question.

Fold a Money Origami Shirt with my easy step-by-step instructions. Start by taking the bottom left corner and folding it up towards the top so that the left edge of the dollar lines up along the top edge. Put the flap through the ring and tuck in the last flap.

Youll have a little white tab remaining and sticking out up top. Fold some trousers the perfect size to go with the shirt. You now have a dollar bill ring.

This origami is so stunning you may be tempted to keep it as a decoration for yourself. Take the remaining section of that vertical part you just brought down and fold it up through the main part of the ring. Dollar Insignia Ring Instructions Start with a US dollar bill with the president facing down.

Dollar Bill Origami CRANE bird MONEY folding tutorial from Falten mit Yvonne. Fold in half lengthwise. For example for the 2 top corners fold them down to line up with the bottom edge of the dollar.

This ring is pretty simple to fold and is actually pretty cool looking. Crease the fold then open the dollar up and repeat that fold on all 4 corners. LEARN HOW TO FOLD THIS MONEY ORIGAMI RING.

Transform a dollar billin whatever denomination you desireinto a beautiful and breathtaking crane. Ill show you two easy designs. Fold the 1 back down and slip the white tab underneath the piece you just folded down.

No glue or cutting the bill is needed. How To Fold One Dollar Bill Into Ring.

Read more

How To Fold A Dollar Into A Flower

Fold the top and bottom edges in to meet the middle crease. Add Tip Ask Question.


Dollar Bill Daisy Flower Money Origami Dollar Bill Origami Dollar Origami

But there is no picture for step 5.

How to fold a dollar into a flower. Hawaiian Style Money Folds. You can then use the flower in any way that you would like to even inserting it into a napkin for a special dinner party. Approach wrapping the bills the same way you wrapped the bud by sliding the wire through the bill fold and bending the wire downward.

How do you fold a dollar bill. Although dollar bill origami is enjoyable it is harder to do simply because the material making up the dollar bill includes fabric which makes it harder to fold. While money origami is thought to have started in the early 19th century it did not become widespread as a hobby until the 1950s.

Dollar Bill Origami Flower. By the way if youre thinking of giving a gift card instead of cash heres something to consider. Learn how to fold a dollar bill money origami flower with this easy-to-follow 6 step guide.

How do you fold a dollar bill into a flower. Easy Money Origami Hawaiian Lei Flower Dollar Circle Graduation. First fold the white edges in at the top and the bottom.

Aromatic plumeria can thrive in a pot craig folds five manites money into plumeria flowers turning brown then dying. This dollar flower will make for a great gift or a. Make sure the wire is the same length you used for the bud.

By folding money you can turn a few bills into a gift thats creative and memorable like a heart or a rose. Pre-crease the money into quarters horizontally and in half vertically. Using three or four bills you can make a modular flower.

Dollar Bill Flower Instructions Place the dollar bill with the Presidents face up. Use floral wire or pipe cleaners to encase each petal inside the wire. Dollar Origami Sword Quick Tutorial How to Make A Dollar Origami.

I learned how to do this from an origami book when i was ten years old haha. This may include animals flowers geometric shapes or abstract designs. Money Origami Flower Edition.

Next fold it in half again then take the white edge on the right side and fold it down unmore. Or 10 dollar bill origami or 100 dollar bill. This is a beginner folding tutorial and can be accomplished within 10-15 minutes or less.

In this video we learn how to fold a ring out of a one dollar bill. DIY Origami Rose Money Superholly How do you make something out of a dollar bill. If there is and it is just a pc problem ill look into it if not and there really is no picture for step 5 then adding the picture.

In 2006 Best Buy the home electronics store made 43 million in revenue from unused gift cards. Fold the four corners in to meet the middle crease. Take bill and fold lengthwise.

The best way to make origami flowers is to use paper of different colors. Money origami sometimes known as dollar bill origami is the art of folding paper currency into three-dimensional objects. Money Origami Flower Edition 10 Diffe Ways To Fold A Dollar Bill Into Blossoming Bloom Wonderhowto.

When you are finished your bill should look like the one here. 10 Different Ways to Fold a Dollar Bill into a Blossoming Bloom The very first banknotes were used by the Chinese in the 7th century during the Tang Dynasty. Enjoy and i am excited to see all your future flowersthis is not my design.

Use individual wires or pipe cleaners to wrap through and around dollar bill petals. Posted on October 18 2018 by Darmawan. Before it was used as a true currency paper money was used as part of a deposit system in which merchants would leave large amounts of coins with a trusted associate and receive a paper receipt for the.

How do you fold a dollar bill into a circle. Next fold it in half and then spin it around 180 degrees.

Read more

How To Insert Folded Paper Into Envelope

Insert the letter into the envelope. Once you have a rectangle with your various folds on one side its time to create the functional part of the envelope.


Common Paper Folds

Ensure that the entire address including the zip code is visible before sending the mail.

How to insert folded paper into envelope. Do CrtlF2 Variable tab and select User Field name it make sure Format is set to Text and click Insert. To fold a rectangular sheet of paper into a square envelopehttp. Fold the upper third down toward you.

To fold the letter correctly you must take the bottom 13 of the letter and fold it upwards towards the letterhead – it should be folded about halfway to the top. Insert into envelope with last creased edge inserted first. Pay close attention and bookmark this page because its hard to remember how this works — at least I find it hard to remember.

Hold the letter in the other hand so that the top part of the letter will be at the top of the letter. Then crease the fold. Place the sheet facedown top toward you.

Slide the letter into the envelope. Also known as a paper folding machine envelope stuffer or even a letter stuffer a folder inserter is a vital part of your busy mailroom. I think the reason is that the finished product is on the diagonal of the original piece of paper.

Window envelopes should be stuffed with the address of the recipient facing outward through the window. Take the letter so that the folds face outward and the top fold coincides with the top of the envelope. Next you fold the top down and crease that fold also.

Fold the lower third of the sheet up so that the address will be on the outside. Open a new Write document do Insert Envelope Insert clear anything in the addressee frame out of it and put your cursor in the home position in the frame. The proper size should also be considered when stuffing an envelope.

Insert folded mail with the final crease facing the front of the envelope. 10 Window Envelopes Inserting 8 12 by 11 inch paper 1. Whatever you decide to call them their primary purpose is to fold and insert documents into envelopes quickly and efficiently.

This will secure the top triangle of the envelope in place. This is a simple elegant way to fold a letter into its own envelope. Fold from left to right to 12 inch of the last crease.

You can hold a ruler sideways between your fingers and slide the thin edge of the ruler along the paper to create a flat and crisp crease if you want to. To mail you must place the lettehead head down face forward into the envelope. Hold open the flap on the business envelope with one hand.

Fold the triangular section in the back up and over the top flap. Video tutorial showing all you lovely viewers how to fold a rectangular sheet of paper into a square envelope.

Read more

Fold A Full Piece Of Paper Into A Letter

Johnson and the town andor county. Use a letter-size piece of paper.


The Lost Art Of Folding Notes How To Fold Notes Paper Crafts Origami Folding Notes

Letter size is 85 by 11.

Fold a full piece of paper into a letter. This will leave the top 4 inches of the paper exposed. The front of the envelope looks like a flat paper rectangle with two corners missing — but of course you can always stamp on it. Get a square piece of paper.

If youre outside the US use A4. Fold the Paper Toward the Center. Now thats after I wrote the directions but the third one you do shouldnt take you much longer.

To fold the letter correctly you must take the bottom 13 of the letter and fold it upwards towards the letterhead – it should be folded about halfway to the top. Other tutorials to check outWedding Anniversary Origami Card httpsyoutubeX6kQgPrBxysPlushie Keychain httpsyoutubeYizpae3MNkwDIY Gift card h. Folding the piece of paper into an alphabetic letter at lines parallel to X-axis thereby dividing said piece of paper into a plurality of segments.

Leave the dialog up but scroll down to the letter and place your cursor at the position where you want to type the address. Fold from left to right to 12 inch of the last crease. Fold the left and right sides of the paper in towards the middle vertical center.

Fold the letter from the bottom to within half an inch of the top edge. Defining a rectangular piece of paper with an X-axis parallel to a width thereof and a Y-axis parallel to a length thereof. With the edges even at the sides crease the fold.

This leaves you with a 5-inch by 8 12 inch folded letter. You need to cut it or else this doesnt work. Fold the bottom-right corner in.

However there are other clever ways to fold a letter to give it a touch of charm. Flip the paper over and collapse into the base form shown below. Place the letter face up on the desk.

Fold the paper in half Start with the colored side down white side up. Insert into envelope with last creased edge inserted first. Fold the top 4 inches of the paper downward creasing it where the bottom edge of the paper sits.

Fold a letter Arrow Style. Use a ruler to make sure that the crease is exactly 5 inches from the bottom edge. Actual size starting from an 8 12 x 11 sheet of paper is 3 78 x 6 inches.

To mail you must place the lettehead head down face forward into the envelope. Next you fold the top down and crease that fold also. Fold from right to left a third of the sheet width.

Flip the paper over and make a horizontal fold that goes through the center of the x crease pattern. Fold the top half in half. Take the left edge of the paper and fold the paper toward the center of the paper about one-third of the way.

In the dialog select Input. A method for folding paper into alphabet letter shapes comprising. Fold the left and right sides of the top triangle layer up to touch the top of the project.

An envelope fold is when you take paper and fold it into an envelope. The envelope is addressed in the front just as it would be today. Follow these visual instructions to fold a letter into a cute compact arrow shape.

The simplest letterfold is to fold a sheet in half. A common letterfold is to fold a sheet into thirds so that it fits into a standard-size envelope. If you ever passed notes in class this folding method falls among some of the more sophisticated styles.

Fold the bottom in three-quarters. Fold the bottom half in half. Then crease the fold.

If you live on a farm you would only include the county. On the back or in the upper left hand corner of the front you write your initials and last name JE. The tip of the triangle that appears on the left side should line up with the left edge of the paper.

Read more