How To Fold The Bottom Of A Box

If you dont and only fold the bottom flaps over each other the box could collapse when lifted. A trick is to fold your paper like a sail on a boat and cut the excessStep 2 Fold the paper in half.


Free Tuck Top Snap Lock Bottom Box Template Box Template Template Paper Paper Box

Complicated fold with no tape.

How to fold the bottom of a box. This creates the glue tabs needed to assemble the box. Step 19 Fold the flap of paper down along the dotted line that intersects the two triangles. Open the box such that its not flat and position it into a.

Keep the box flat when youre folding down the flaps. 1 Put the top flaps of the box down and open the box. Where the side and end papers meet in the corners is the only tricky part but just tuck and fold until flattened and then place a piece of tape to hold.

Before you put anything into a cardboard box you should tape up the bottom. You dont want your best china in pieces all over the floor. Once the cardboard box is in a rectangular shape flip the box over so that the four folded flaps are on the bottom.

Its better to first put the smaller edges inside and then the larger edges. Make sure the slits go all the way to the edge where the box is folded. Glue the tabs to the sides of the box with a good craft glue.

Fold the top triangle of paper up a little bit to fit into place at the bottom of the box. Fold the top flaps down. Pinching it down holding it up.

Fold it up over and your side is built and then you do the same on the other side going to open it up. Stitch Closed to Box the Bottom Corners Stitch through all layers along the cut edge to close the corner. Follow the same instructions for both the box bottom and box top lid.

If it doesnt seem to fit over the other half well then try. Fold over half of the rectangle to become the new box top and bring it over the other half using the creases and slits as the new side. As a shape its similar to a mailer box but made out of paperboard.

It is important that the paper is square since you are creating a box. Learn how to fold the Snap Lock box vs. You can also look for letters or arrows on the box that indicate which side is the topStep 2 Fold the top flaps down on both sides.

Moving Box Fold 1. Never interlock the flaps of the box as it reduces the strength. Use your finger to crease the fold.

Only the flaps at the top of the box will have these tabs. Fold the cardboard into a box shape. Keep the box flat when you fold down the flaps.

This will form the edge of the box. That completes the bottom of our box. Tuck Top Box Features Fits a wide range of products.

Step 1 Locate the flaps at the top of the box. The Snap Locks bottom flaps fold to create a secured lock without requiring glue tape or stap. Your box is done.

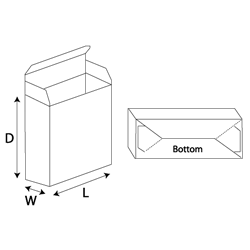
No one wants the added stress of a box that bottoms out so we decided to bring our box to the gym and put it to the test box boot camp. The double-wall tuck top box has one opening to the top with two closing flaps that fold into the bottom of the box with a friction lock. Step 20 Fold the other side of the box now along the existing creases like you did.

You can also use staples or tape. Step 1 Begin with a piece of square paper. Backstitch at the beginning where the seams match and at the end.

This is the best position to fold a cardboard box. 2 Flip the box over and fold down all of the edges into the inside of the box. 3 Use your packaging tape and tape down the long horizontal side of the box.

Tape the first folds to the inside lip of the lid. Then fold the larger flaps on top. Coming up next I am going to show you how to fold the lid of your box.

Find out if the complicated fold does more than the simple fold and how much tape do you actually need to guarantee a secure close. Form the bottom of the box by folding up both sides but leaving the middle column unfolded. The box should still lay flat after you fold the flaps.

Open the cardboard box. If desired reinforce by stitching again for extra strength. You can use origami paper or fold any piece of paper diagonally from the corner to the opposite edge and trim off the excess.

To begin closing up the box fold the small flaps in. Fold it in and just follow the line that you have created with your folds. The Auto Bottom box.

Make creases and fold the edges that stick up over the box as shown. The top of the box should have four additional flaps extending towards the ceiling. Crease the fold with your finger then open the piece of paperStep 3 Fold the paper in half along the other side.

Be sure the glue tabs are on the inside. Once you find the top flaps fold them all the way down so they touch the outside surface of the box on both sides. To find the top of the box look for the flaps that are connected by small cardboard tabs.

It should still lie flat after the flaps are folded down.

Read more

How To Draw A Box With A Square Bottom

Ad Learning How to Draw – Video lesson for fine artists – Drawing Academy online course. Click BorderArt this option wont be available if youve selected a table cell or AutoShape other than a rectangle.


Pin By Olga Tomberg On Shtrih Perspective Drawing Lessons Geometric Drawing Perspective Art

You should now have something that looks like a box.

How to draw a box with a square bottom. Double-click the text box to edit the text or change the text attributes. This involves some drawing but youll impress friends with this intersecting lines trick. Left 150 top 250 right 450 bottom 350.

You press Alt and while holding it text a certain Alt code on Num Pad while its turned on. You can always change your shape dynamically by dragging the side widget. Two edittext fields and a button should inside the box and outside of box is list.

Draw the smaller objects by first constructing them in boxes and drawing them in proper circular perspectivesuch as the above ball and fish bowl. Alt code shortcut works on all Desktop and many Laptop computers running MS Windows. Divide the desired 4 depth by 2 2.

Flatten project and align it with the grid on a cutting mat. This video will show you how to do a great bar trick puzzle. Right-click the text box AutoShape picture or object that you want to add the border to.

Click the artboard and in the dialog box that opens type the number of sides for your shape for example type 6 to create a hexagon. Using your scissors cut out the square. Make sure you only draw on the line to make sure its straight.

Connect the boxes to win some bets and free drinks. Draw a horizontal line between the diagonals projecting from the bottom two corners and the vanishing point. B the saucer is first drawn within a rectangular box.

Kindly answer in detail because I am new in Android programming. Turn bag right side out and push the corners out. Match bottom and side seam pin and sew down with desired seam allowance 14 should be fine.

Discover professional drawing techniques every fine artist must know. Using the Select tool or the Text Box tool click an edge of the text box to select it and then drag a corner to resize it. Ad Learning How to Draw – Video lesson for fine artists – Drawing Academy online course.

Lasso Select can also be used to select individual objects. Mark a 2 square on both bottom. You can change the size of an image with your photo management software.

Press and hold the Rectangle tool in the Toolbar and select the Polygon tool. I want to create a rectangle box around the elements as shown in figure. Click on the tool to activate it.

How can I achieve this. Any type will do but if youre starting as beginner graph paper is bestStep 2 Get a pencil. Mark and Cut Squares From The Bag Corners.

Our tutorial shows a 4 deep boxed corner. Use the Properties toolbar to change the border and fill options. Fun Party Tricks provides tons of great howto videos for cool party tricks.

Select a larger size but keep the dimensions the same. 22 rows Alt Codes for text square symbol on keyboard. Rectangleint left int top int right int bottom.

Once activated draw a closed figure around the content that you want to select. With a pencil you can erase any mistakesStep 3 Draw a rectangle or square using the boxes. The square box template can be enlarged and printed onto multiple sheets of paper if you want to make a larger box.

In the bottom right corner measure 2 away from the side and the bottom and trace a square. Discover professional drawing techniques every fine artist must know. 2 is the size of the square that will be cut off of both bottom corners.

Keep track of the length of this side so you can make all four sides the same lengthStep 2 Considering the side drawn in the previous step as one of the arms construct a right angle on each end of it. You can draw it. Step 1 Draw a side of the square using ruler.

Thus the end points of the side drawn in the previous step would also be the two vertices of these right anglesStep 3 Mark a point on each of the newly drawn. Both of the concentric ellipses for the bottom and top of the cup are constructed within rectangles which are in parallel perspective. Step 1 Get blank sheet of paper.

At the point where the right diagonal line meets the newly created horizontal line draw a vertical that connects to the diagonal that has been drawn from the top corner of the square. Once you know how to do it its very easy to accomplish. Left 150 top 150 right 450 bottom 450.

Select the appropriate Format menu item and click the Colors and Lines tab.

Read more

Which Direction Does Bottom Of Box Go

That is you can pivot text 90 or 270 degrees so that it appears sideways. Not sure how to change a filter in your home.


Printing Packaging Terms Part 3 Tucks Folds Johnsbyrne

When direction is set to rtl right to left left is ignored instead of right.

Which direction does bottom of box go. If placed along a road or highway the bluebird house should open parallel to or away from the road so the birds will not be hit entering or leaving their nests. RF emits from the glass portion of the smart meter radially back into your house. Your electrical utility box is made of grounded metal including the sides top bottom and back.

RF cannot penetrate grounded metal so your utility box actually blocks RF from radiating out the back. Well watch my video that easily explains the process. The animation is played as normal forwards Play it.

Install Your Air Filter In the Right Direction To Avoid Airflow Issues. In the early to mid-1900s there were infrequent cases of. This means the side with the wire-frame will be on the outside or the side closest to you and the side without it will be inside closer to the unit.

Traditionally Chinese Japanese and Korean are written vertically in columns going from top to bottom and ordered from right to left with each new column starting to the left of the preceding one. Ideally the nest boxs opening should face toward trees or shrubs within 100 feet so young bluebirds have a place of safety for their first flight. If in doubt consider where most of the passing traffic is.

The flex-direction property defines the main axis of the flex container and sets the order in which flex items appear. Found a way that works for FFChrome. So the bottom block will be at the actual bottom and top and middle are on top.

Is the arrow on the filter confusing you. Right-click the edge of the shape or text box. When you set values for opposite sides top and bottom or left and right the result might not always be what you expect.

The animation is played forwards first then backwards. The width and height properties and minmax properties includes content padding and border. Water should always enter from the bottom of a condenser the end closest to the flask and exit from the top of the condenser.

In a shape or text box you can change the direction in which text is read. That is you can pivot text 90 or 270 degrees so that it appears sideways. Are you too laz.

The stroke order and stroke direction of Chinese characters hanzi in Chinese kanji in Japanese hanja in Korean Japanese kana and Korean Hangul all facilitate writing in this manner. This doesnt work for Chrome. Proper orientation of text box saves lot of space in the report layout eg a report having 10 columns with text description in horizontal direction will take more space in the report as compared to same report having those columns in vertical direction or 270 degree direction.

Scripts have a writing direction and so languages written in a particular script will be written with the direction of that script. In most cases bottom is ignored if top is already set and right is ignored if left is already set. Languages can be written in more than one script.

For example Azeri can be written in any of the Latin Cyrillic or Arabic scripts. When written vertically Japanese text is written from top to bottom with multiple columns of text progressing from right to left. Right-click the edge of the shape or text box.

Setting flex-grow on a higher number 1 is enough for middle will make it take full middle size. Force F accelerates both boxes to the right. The width and height properties and minmax properties includes only the content.

The animation is played in reverse direction backwards Play it. Doing it this way always ensures that your condenser will be full of. In the following example we use the flex-direction property with the column value.

If the sign is viewed from above for example from a floor above then top down is often easier to read. When written horizontally text is almost always written left to right with multiple rows progressing downward as in standard English text. If the most traffic is on the lower level than bottom up is.

And the net force F f 21 on box 2 accelerates box 2 to the right the frictional forces having adjusted themselves so that there is no relative movement between the two boxes. Or you could say frictional force f 12 accelerates box 1 to the right. Vertically text reading from top to bottom Rotated by 270 degrees text reading from bottom to top.

If it does not have an arrow though youll want the side with the wire-frame to be facing outward. Border and padding are not included. When written in Latin or Cyrillic scripts Azeri is written left-to-right LTR.

This is less common but worth considering especially in multi-level shopping centres. In a shape or text box you can change the direction in which text is read.

Read more