Origami Ring With Money

Origami Ring With Money

Instructions for Money Ring. Money Origami Ring.

Origami Ring With Money
Let S Create Dime N Ring Tutorial Ring Tutorial Dollar Bill Origami Money Rings

Now fold the bill in half lengthwise is there an echo in here.

Origami ring with money. This Money Insignia Ring was created by the Origami Resource Center and you can find diagrams for the model here. For more information including a step-by-step overview of the folding process as well as to get started making your own cardioid money rings stars watch this free origami lesson. Clothing and Accessories Money Folding.

A bit of bling for your finger. How To Fold A Dime In A Dollar Bill 14 Steps With Pictures. Your best best is to go to the origami database and search for ring.

I found this easy enough to fold and again you can make it in a pinch. With this guide youll learn how to make a heart-shaped money ring from a dollar bill with origami the traditional art of Japanese paper folding. Money Origami Origami Dollar Bill Owl Dollar Origami Pinterest.

Start with a crisp dollar bill with the black-side facing up. Alexandr Pak has designed a couple of great origami trees using paper money. Fold a Money Origami Shirt with my easy step-by-step instructions.

You can use nicely patterned origami paper with this design and it makes a really pretty. This takes the square ring and gives it a bit more bling. Fold it away from you.

Using these two resources it was determined that. Then fold the white edge near the end of the folded bill. Origami Shirt and Tie.

Fold a shirt with necktie all from a single bill. Dollar Ring and Dime in a Ring is diagrammed in The Buck Book Traditional Ring and Heart Ring is diagrammed in Guide to American Style Money Folds Peace Ring and Diamond Heart Ring is diagrammed in Origami to Astonish and Amuse. Next fold the 1 at that same end so that the 1 is centered in a little square of folded money.

Dollar Bill Ring. Fold the dollar bill in half lengthwise top to bottom. Each star is made from a single dollar note and heres what they look like up close.

Origami Dollar Ring Dollar Bill 1 Dollar Stock Photo Image Of. Money Origami Diamond Ring. Want to master.

Dollar Bill Origami Ring With Heart Handmade Money Art Little Etsy. You dont even have to use a dollar bill. And a more feminine touch.

It will hold its shape when mailed in a box too. New SavvyConnect App to pay out 1 million more this year in. Learn how to fold a 6-pointed money origami star star of David from a dollar bill.

Theres actually been a lot of origami made from folding paper money and the different colours used on the bills from different countries can also give the finished piece a colourful and unique look that you wouldnt normally see with regular origami paper. FUN WITH MONEY SURVEYSAVVYCOM CELEBRATES 18 MILLION PAYOUT WITH DOLLAR BILL ORIGAMI. Make the crease right at the border where the money changes from white to black.

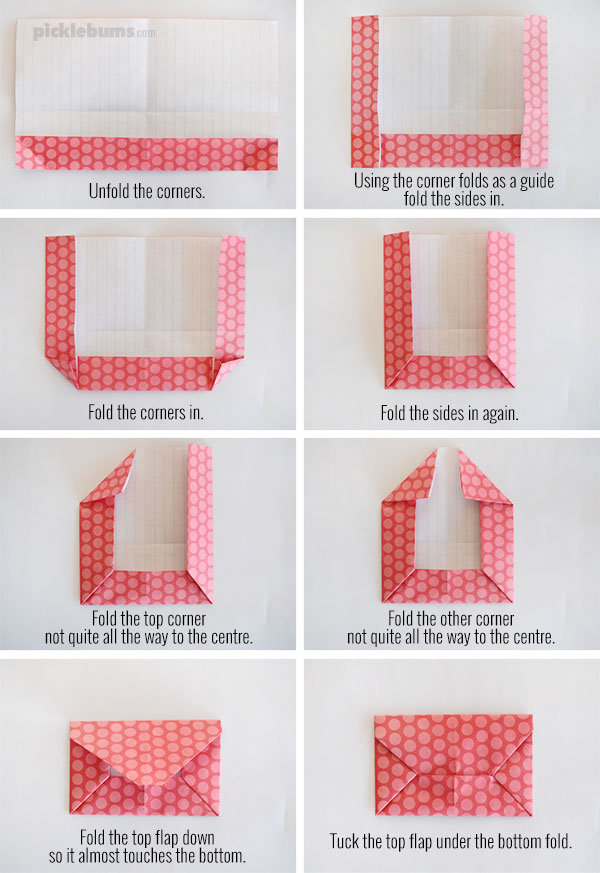
Fold the the top and bottom edges of the dollar bill down. Our detailed photo and video instructions will make learning this moneygami easy. Now fold the bill in half lengthwise.

It appears slightly less like a collegiate football ring. Dollar Bill Ring diagrammed in Money. The great part about this model is that George Washingtons face is visible at the front of the ring.

Read more

Paper Made From Mushrooms

Paper Made From Mushrooms

Cardboard boxes preferably or paper -must be clean you dont want cardboard that has been wet or is obviously dirty or moldy. Press down the red mushroom hat.

Paper Made From Mushrooms
Origami Mushroom This Video Shows You How To Make An Origami Mushroom Designed By Vincent Floderer You Should Stuffed Mushrooms Origami Easy Mushroom Crafts

To make the mushrooms seem to stand on their own I place a piece of kraft paper on top of floral foam and poke toothpicks through the paper and into the foam.

Paper made from mushrooms. Then I place the stem bottoms of my mushrooms over the toothpicks and they stay in place beautifully. Tear strips of newspaper and dip into the paper mache solution. Did you know that paper can be made from mushrooms.

These are very flexible guidelines. Empty and clean yogurt container or other type of container with a lid. Paper Mache solution.

This dish is decorated with three amanita muscaria aka the fly agaric toadstool mushrooms which the center one includes a removable cap to hold an incense stick a little snail a branch and a leaf to hold the ashes from burning incense. The basic process of making paper is straightforward and no different for mushrooms than for other fibers. The process of making mushroom leather can reduce water usage when compared to animal leather by up to 99 which includes the water used to grow and dye the final material.

It is overall it is about 25 inches tall and the diameter is. The one significant difference is that you are using a chitin base rather than a cellulose base. Stir until lumps are gone.

To grow some really great mushrooms right at home you will need. May 18 at 700 PM. Gather Materials for a Great Mushroom Experiment.

The cell walls of fungi are made of a biological polymer called chitin which is a similar to cellulosethe key ingredient in plant-based paper. Edible Mushrooms From Toilet Paper. There are several variations on the theme.

Its the most wonderful bonkers craziest use of mushrooms says Drennan who has even created a 150-page book made entirely of fungi. Polypores are often used since they have a high fiber content persist a long time in. Allow the glue some time to set.

Adhere to the top of the mushroom. Mushroom leather is no longer a concept material biotech start-ups like the ones listed above are producing Mushroom Leather but are not producing it at scale yet. If our mushrooms make you hallucinate please inform us immediately so we can overcharge you.

Edible Mushrooms From Toilet Paper. At 70 a time his lessons are not cheap but they fill up. Mix flour and water together to create a paste that resembles thick cream.

Apply glue on the strips one side only. Glue the ends together to make a paper roll. The use of cellulose fibers from plant material for making paper.

Many mushrooms can be used to make paper especially the tougher inedible species that are often overlooked.

Read more

Cut And Fold Paper Bed

Cut And Fold Paper Bed

Of the paper to the first place where two. The fold-and-cut theorem states that any shape with straight sides can be cut from a single sheet of paper by folding it flat and making a single straight complete cut.

Cut And Fold Paper Bed
Bundle Of 4 Rooms Printable Pop Up Paper Dolls House Etsy Paper Doll House Paper Dolls Paper Doll Printable Templates

Desired pattern of cuts can be simultaneously produced by folding and one straight cut.

Cut and fold paper bed. 1 With folded Inset Folds 2 With unfolded Inset Fold Partial or Shadow fold 2 Without Inset Folds – Just Cut and Fold 3 Without Inset Folds – Fold Cut Fold 4 Traditional Fold Cut and Fold Combination Combi fold 5 Traditional Fold Cut and Fold Combination Inverted Combi. The first published reference to folding and cutting of which we are aware is a Japanese book Wakoku Chiyekurabe Mathematical Contests by Kan Chu Sen published in 1721. RELEASING 41 The Fold to Fold Cut THE FOLDED This versatile and simple cutting technique releases the card along a section EDGE of any crease to create a pleasingly complex cut-edge shape where previously 41 The Fold to there had been a simple fold.

4-Sided fold and cut paper cutting can be easy for kids to do paper craft cutting. The cutting is a lot easier compared to the 5-sided 10 layers and snowflakes 6-sided 12 layers. One of the problems asks to fold a rectangular piece of paper flat and make one complete.

Pro Idees unique bed has a frame partially made of paper and corrugated cardboard allowing it to fold like an accordion. Then cut the 4 black slits in the piece of paper as pictured in the diagram. The Miura fold ミウラ折り Miura-ori is a method of folding a flat surface such as a sheet of paper into a smaller area.

Turn the paper the other direction and do the same thing the other way so you end up with 16 rectangles. It comes with a three-part foldable cushion thats 22 inches thick so while its probably not the kind youll want for a permanent bed it should work well enough for a spare like this one. To make the table trace the pattern onto vellum.

Draw dotted lines as they appear in the pattern. Then cut the 4 black slits in the piece of paper as pictured in the diagram. Start outside to fold all layers.

Now that you have cut the slits fold down on the red dashed lines. I appreciate the art of cutting and folding paper and the art forms that can be created. I want to try to keep a record of the structures that I can fold cut design and animate using the.

There a number of cut fold methods used by designers at the moment. The corresponding problem that the theorem solves is known as the fold-and-cut problem which asks what shapes can be obtained by the so-called fold-and-cut. Hold Shift to fold straight angles.

Attention Please Please try maximum possible length stretch open it and keep it few seconds repeated several times can reducing the resilience to be relatively. Open and fold edges to middle crease. When fully stretched out the Pro Idee Paper Bed measures 78 x 35 x 14 inches depth x width x height making for quite a comfortable bed for one and a likely uncomfortable bed for two.

Its easy to fold and doesnt have too many layers after the folding 8 layers. This book contains a variety of problems for testing mathematical intelligence. Such patterns allow us to make several shapes at once to make holes within shapes and to dissect the piece of paper into multiple adjoining shapes.

The name kiri cut kami paper was coined in 1962 and has since been widely accepted as the western name for the art of paper cutting. Despite its construction it can hold up to 661 lb. Cut along creases on the shorter ends.

Such shapes include polygons which may be concave shapes with holes and collections of such shapes. 4-Sided fold and cut paper cuttings is a fun and easy craft for kids they will. Fold paper in half.

First cut a rectangle shaped piece of paper. When you stand up the bed the overlapping paper will appear to be fabric folding over itself just as a dust ruffle would. The fold is named for its inventor Japanese astrophysicist Koryo Miura1 The crease patterns of the Miura fold form a tessellation of the surface by parallelograms.

This also solves the folding-and-cutting problem where we want to make a speciied polygon by one complete straight cut after ar-bitrary folding of a square sheet of paper. Cut two small slits on the straight lines at the end of the dust ruffle. Furthermore there are algorithms that tell us where to fold and where to cut.

Drag and release to make a fold. Kirigami starts with a folded paper which is then unfolded and the cuts are opened and flattened always made out of a single piece of paper. You can fold it into an armchair or a bench.

Do not cut the center fold Bend the pieces you didnt cut up. Folding paper bed would be 40times than its original after stretch it is able to use as long as 5-10 years foldable at willsmall and beautiful. I got this great book in the mail called Paper.

Tear Fold Rip Crease Cut which showcases the use of paper in art fashion and designFrom the traditional art of origami and paper cutting through to contemporary experiments in conceptual paper installations and modular folding this book celebrates one of the worlds oldest and most widely used materials in all its visual glory. These are the head and foot of the bed up. First cut a square shaped piece of paper whatever size you decide.

It comes with a foldable foam cushion.

Read more

How To Make Jet Fighter Paper Airplanes

How To Make Jet Fighter Paper Airplanes

-This paper airplane is a great project for people with extra time in-between classes or even if you are bored at home. Select a plane below and lets get started.

How To Make Jet Fighter Paper Airplanes
How To Make Paper Airplane Easy Paper Plane Origami Jet Fighter Is Cool Sukhoi Su 27 Flanker Youtube Paper Plane Origami Jet Fighter Paper Airplanes

It comes from another paper airplane page.

How to make jet fighter paper airplanes. Plus Ive standardized the instructions somewhat so there is no variability left in the design. Paper Airplanes are fun and educational. Thats always the best part about making a paper airplane.

Fighter Jet Paper Planes. Learn how to make a paper airplane jet. However the instructions at that site are quite hard to follow.

Paper Planes have been providing quick and easy fun for generations. How to Make Paper Airplanes. How To Make Paper Airplane – Easy Paper Plane Origami Jet Fighter Is Cool SUKHOI SU-35New Fighter Paper Plane Designs – How To Make a Paper Airplaneorigam.

Learn how to make paper airplanes with these easy instructions. These paper airplanes are inspired by high performance military craft. This specific paper airplane is awesome because it looks like a fighter jet and it actually flys great too.

F-15 Eagle Paper Airplane. This plane was specifically made for speed. How to make a paper airplane paper airplanes or paper plane that flies.

On this origami tutorial I will show you step by step instructions of how to mak. How To Make A Paper Plane That Flies Far 3 Jet Origami Wonderhowto. Access your email find thousands of high-quality videos and get the latest news and information.

Be careful with the ones that are pointy they can hurt. Watch How To Make An Origami F16 Fighter Jet Paper Airplane – Easy Paper Plane Origami Jet Fighter-P62 – Bap34588 on Dailymotion. ABC Action News WestNet-HD the home for WestNet Wireless High-Speed Internet customers in Calgary Alberta Santa Barbara California.

The Gazelle Paper Airplane is n odd looking craft with very stable flight characteristics this canard flyer is a bit tricky to fold but very easy to fly. Both wings and both sides of the tail should be completely identical in size and shape. The design of the fighter jet paper airplane on this page is not mine.

If you like this paper toy please like this video share and leave a comment bellow. Cool paper airplanes to fold how to make a cool paper airplane best origami jet instructions world record plane the best paper airplane how to make a art of manliness fast jet paper airplane. Although it is harder to make it is certainly one of the best paper airplanes you can enjoy.

Fighter Jet Paper Airplane. -While making these f. 4 years ago 27K views.

The Gazelle Paper Plane. Teach your children to make this fast flying paper airplane jet and engage them in far flying paper plane competition. How To Make Paper Airplane Easy Plane Origami Jet Fighter Is Cool Panavia Tornado.

Designed to look like a fighter jet this paper airplane is made for speed. Patterned-side face down Fold the top corners inward to the center line. It is very difficult to get this plane to fly well.

We provide detailed instructions and video tutorials to help you make over 50 different paper gliders darts and long distance flyers. Start with an 8 12×11 paper. Fold the top corners to the bottom edge.

It is DIY paper fighter jet airplane looks cool. Select the plane you want and get ready for takeoff. Origami Paper More information How to make origami F16 jet fighter paper airplanes step by step DIY tutorial instructions How to how to do diy instructions crafts do it yourself diy website art project ideas.

This F-16A Falcon paper airplane has a swept wing with leading-edge extensions that resemble the F-16 Falcon fighter jet. Paper airplane folding instructions for Navy Plane. Also look at the plane head on.

Most planes are best indoors but some will surpise you outdoors. Paper airplane folding instructions for Jet Fighter. When you are complete the plane should be perfectly symmetrical on both halves.

Make this paper toy for kids by following this video instructions easily and step by step.

Read more

Origami Stars From One Piece Of Paper

Origami Stars From One Piece Of Paper

Either way check out this fun origami instructional video for mastering a cube with one piece of paper. How to fold a Ninja Star from a single sheet of printer paper.

Origami Stars From One Piece Of Paper
Easy Origami Star Christmas Star With Paper Ideas For Christmas Decora Easy Origami Star Origami Easy Origami Stars

The negative and absent 2 dimensional space left by the cut points out the contrast to the 3 dimensional reality it creates even though the figures still stick to their origin without the possibility of escaping.

Origami stars from one piece of paper. Cut a Perfect Star. Könkköläs newest piece and perhaps his most striking is of a samurai. 5-pointed star star outline 6-pointed star.

Video by Sara Adams. See other types of paper folding. I think theyre really neat the only origami star which has 5 points and is made from 1 piece of paper.

Flip the paper over to the back side. I like using smaller paper so I usually fold in half vertically and then horizontally. Flip the paper over.

Origami Rooster original design by Satoshi Kamiya. Maybe you are an expert at origami or maybe you dont know the first thing about origami. Fold first the paper has to be a dimond.

He says it takes around three hours for a complex model and maybe more for the most detailed ones. The folds are easier to see this way than with a real bill. If you are interested in stars you may wish to learn how to cut a perfect star.

His creations dont use any cuttingjust foldingbut still result in amazingly detailed creations. Check out this how-to video if you want to origami a cube with one piece of paper. At this point hes been practicing his folds for four years.

Origami One-Piece Ninja Star Flicker – YouTube. Money Origami Star Step by Step Ill show you the instructions with a white piece of paper cut to the same size as a dollar bill. See more free origami instructions.

Cut off the remaining strip. Add Tip Ask Question Comment Download. The paper cut sculptures explore the probable and magical transformation of the flat sheet of paper into figures that expand into the space surrounding them.

Take an ordinary piece of paper and fold it diagonally. With extra heavy duty paper blades it flies super well either by throwing it or. Fold the bottom corner to the top unfold then the left to right and unfold.

In this Instructable you will be making a symmetrical 5 pointed star with only 1 straight cut. Step 1 Fold the bill in half lengthwise and unfold again to make a crease. Artist Juho Könkkölä creates paper figures with the art of origami.

Origami a cube with one piece of paper. I think they are really cute Ive been trying out a new origami paper pad with these its called Origami Craft Pad Creatures Critters It has some cute models in it too. Artist Spends 3 Months Planning and Folding Origami Samurai From a Single Sheet of Paper.

Go to page 1 of origami stars and wreaths. Only downside the paper isnt quite square. More About BYUCMR.

Unfold your square piece of paper. This is known as one cut origami. The square created above is 85 inches on a side.

Sweet little origami stars made from a single sheet of paper design by Peter Keller. Fold the small piece sticking out at the bottom over the edge. Unfold it and then refold it but stick it in between the layers.

Theres no design too complicated and out-there for Calvo to attempt. One cut origami also known as one-cut fold-and-cut and magic cut is a form of origami where you fold up a piece of paper make one straight cut then unfold the paper.

Read more

How To Insert Folded Paper Into Envelope

How To Insert Folded Paper Into Envelope

Insert the letter into the envelope. Once you have a rectangle with your various folds on one side its time to create the functional part of the envelope.

How To Insert Folded Paper Into Envelope
Common Paper Folds

Ensure that the entire address including the zip code is visible before sending the mail.

How to insert folded paper into envelope. Do CrtlF2 Variable tab and select User Field name it make sure Format is set to Text and click Insert. To fold a rectangular sheet of paper into a square envelopehttp. Fold the upper third down toward you.

To fold the letter correctly you must take the bottom 13 of the letter and fold it upwards towards the letterhead – it should be folded about halfway to the top. Insert into envelope with last creased edge inserted first. Pay close attention and bookmark this page because its hard to remember how this works — at least I find it hard to remember.

Hold the letter in the other hand so that the top part of the letter will be at the top of the letter. Then crease the fold. Place the sheet facedown top toward you.

Slide the letter into the envelope. Also known as a paper folding machine envelope stuffer or even a letter stuffer a folder inserter is a vital part of your busy mailroom. I think the reason is that the finished product is on the diagonal of the original piece of paper.

Window envelopes should be stuffed with the address of the recipient facing outward through the window. Take the letter so that the folds face outward and the top fold coincides with the top of the envelope. Next you fold the top down and crease that fold also.

Fold the lower third of the sheet up so that the address will be on the outside. Open a new Write document do Insert Envelope Insert clear anything in the addressee frame out of it and put your cursor in the home position in the frame. The proper size should also be considered when stuffing an envelope.

Insert folded mail with the final crease facing the front of the envelope. 10 Window Envelopes Inserting 8 12 by 11 inch paper 1. Whatever you decide to call them their primary purpose is to fold and insert documents into envelopes quickly and efficiently.

This will secure the top triangle of the envelope in place. This is a simple elegant way to fold a letter into its own envelope. Fold from left to right to 12 inch of the last crease.

You can hold a ruler sideways between your fingers and slide the thin edge of the ruler along the paper to create a flat and crisp crease if you want to. To mail you must place the lettehead head down face forward into the envelope. Hold open the flap on the business envelope with one hand.

Fold the triangular section in the back up and over the top flap. Video tutorial showing all you lovely viewers how to fold a rectangular sheet of paper into a square envelope.

Read more

Youtube Fortune Teller Game

Youtube Fortune Teller Game

It can be a little tricky but my. Red for the love.

Youtube Fortune Teller Game
Pin On Misc Crafts

Green for the advice.

Youtube fortune teller game. The Luck Meter shows you how you rate in love career and money matters right now. Fortune telling games have been a Halloween tradition for a long time. These games are not only a lot of fun but some people feel that they can have serious implications as well.

Fold the top edge of the fortune teller down to the bottom edge so 2 of your colored squares are on top. Use my answer wisely and your future will become better. Fortune tellers Fortune cookie Luck meter Ask the genie All fortune teller games.

Blue Red Green etc. Is luck on your side or might some unfortunate circumstances arise. Everyone seems to enjoy those.

Claudia was wishing for another one of the Victorian Game pieces. Ask the ball about the question of interest and get the answer. All your questions will be private ofcourse.

Love Sex Psychics Tarot All Subscribe. Kiddos can get creative and fill in the blank cootie catcher template I have below or grab the already designed chatterbox printable to get them thinking and talking about things. Help your child follow the directions at the bottom to fold it properly.

If you have any questions about your future you can ask me right here. About This Game A short branching story game about fortune telling with tarot cards. Fold the fortune teller in half so the squares are on the outside.

You just have to touch the heart of the indicator to receive its messages. In Cartomante play one afternoon in the life of the mystic Miss Cartomante a witch with the very important job of giving somewhat accurate and foretelling card readings to the eccentric residents of the Metropolis and helping solve their highly questionable problems. Slide your fingers underneath the squares to operate the fortune teller.

Hello i am your free fortune teller. While the children are busy playing trick or treat adults can indulge in games that involve a bit of mystery. This is the main page for my social skills paper fortune tellers.

Turn over the fortune teller one more time and either colour the 4 squares different colours or write the colour names in their colour eg. I can predict your future. The fortune teller will give you an answer right away.

Fortune cookie Luck meter Ask the genie All fortune teller games. Here you goIts kind of a fun thing you can cut the pieces out and put together your own Wheel of Fortune so to speak. Nancy wanted me to conjure up haha a Fortune Teller imageI was actually planning on saving this one for Halloween but well.

The game This is the second lesson in a three-week project on following instructions. They feel intrigued by the concept of fortune-telling. Enjoy the videos and music you love upload original content and share it all with friends family and the world on YouTube.

Flip your fortune teller over so the numbers are face up. Blue for the wisdom. Love Fortune Teller Color Every day love clairvoyance color colors the love life.

Midnight blue for bad news. The heart changes color following its message. Last week children learnt how to make their own paper fortune-teller.

Paper Fortune Tellers social skills games for children with ASDs and other children too By joels Oct 26 2013 Aspergers autism paper fortune teller social skills game social skills group social skills teaching. Insert one thumb and finger behind two of the square flaps and gently push the fortune teller out insert the other thumb and finger behind the other two squares until your points meet in the middle and it opens and closes a bit. You will get your future prediction right away.

Click each meter below. To fold your fortune teller Print out the fortune teller and have your child cut off the bottom strip with the instructions and cut around the outside dark gray line. Money Health Numerology Birthday 2021 Planetary More.

For all questions relating to advertising please leave us a message here. Fortune-tellers week 2. A cootie catcher or fortune teller or chatterbox whatever you want to call them are super quick and easy to make and can keep kids busy playing the game for quite a while.

Daily Love Chinese Career What to Watch Summer Free Birth Chart. Our free fortune tellers have answer to all your questions.

Read more

How To Fold Paper Into A Letter

How To Fold Paper Into A Letter

The idea is to create a center crease. Fold a little concertina in.

How To Fold Paper Into A Letter
Diy Stationery For Valentine S Day Handmade Charlotte Diy Stationery Origami Envelope Origami Easy

Make sure that the letter head is up when you place it inside the envelope.

How to fold paper into a letter. Starting with one corner fold it doggy ear style towards the middle fold. This leaves you with a 5-inch by 8 12 inch folded letter. I show you how I fold 8 12 x 11 size letters.

Youll use that middle fold as a guide. Basically take the letter and lay it in a flat surface then find a spot in the paper which is almost a certain way up and then fold from bottom to that spot and crease it. Then crease the fold with your fingers.

The closing should be at the top and not in or even near the envelope. These instructions were designed for 85 x 11 inch paper commonly used in North America. Sending a special note and dont have an envelope.

The tip of the triangle that appears on the left side should line up with the left edge of the paper. Without glue they were not always secure. Fold the paper in half from left to right and then unfold back to the start.

This will leave the top 4 inches of the paper exposed. Sounds simple and it is. Next you fold the top down and crease that fold also.

Then crease the fold. Then you need to fold the bottom corners of the paper in. Repeat on all four corners.

Envelopes were created long after mailing letters began. Print out the letters that you wish to fold go at least 200 dpi in your print. Part 1 of 4 – How to Fold your letter into a cool shape.

Fold the Paper Toward the Center. With the long side on top fold in half left to right and then unfold. Then fold from the top above the previous fold and then crease it so that it is a three fold letter.

In this four part series learn how to fold your letter into cool shapes so you can deliver them on their own. How to Fold Books into Letters Step by step tutorial Step 1. The bottom of the paper corner should be against the outer fold lines each side making a triangle shape.

Fold the sheet of paper in half lengthwise to start. Start out with a rectangular sheet of paper. People wrote their letter on one side of the paper and folded it into an envelope shape writing the name and destination on the outside.

To fold and insert a letter into an envelope start by folding the bottom edge of the letter up so it falls one third the way up the page. Remove a half-inch of paper from the long side of your letter. I want to be a cheesy girl and fold the letter all cute-like but apparently 13-page thick letters are not the most cooperative for complex note-folding.

Start with the white side or writing side of your paper facing up. Anything wider or narrower might not work out. Sometimes I write 13-page letters to my boyfriend.

The key is to keep the paper flat create even crease lines and in two folds will be. To fold the letter correctly you must take the bottom 13 of the letter and fold it upwards towards the letterhead – it should be folded about halfway to the top. If you dont cut the A4 sheet after step 5 you will have a rectangle instead of a square.

Use a ruler to make sure that the crease is exactly 5 inches from the bottom edge. To mail you must place the lettehead head down face forward into the envelope. I found that US Letter size works best.

Fold the top right corner down to the center crease and then repeat with the top left corner. Take the left edge of the paper and fold the paper toward the center of the paper about one-third of the way. Consequently I wasted a few good hours of my day learning new ways to fold letters so that I could fold each page.

The only supplies you will need are your hands and your letter. Place your letter paper into the envelope without folding the paper Note that the opening of the letter should be in the envelope with the body and closing both visible and outside of the envelope. Now you need to unfold the two flap you have just made.

Next take the top edge of the letter and fold it down so theres a 12 inch gap between the. Fold the top 4 inches of the paper downward creasing it where the bottom edge of the paper sits. Letters were not always sent in an envelope.

Fold in Half. To make it work with the A4 paper you should trim the paper 3 centimeters. Choose a book with 6-700 pages for a complete folded set of letters such as Mrs and Mr or a 200 page book to make a large monogram.

See the picture for details.

Read more

How To Fold Envelopes Out Of Paper

How To Fold Envelopes Out Of Paper

Re-fold the lower right section. Secret note squares are a great way to pass along a secret message to.

How To Fold Envelopes Out Of Paper
Origami Shell Fold Card Super Quick Start With A 8 5 X11 Piece Of Paper Origami Envelopes Origami Fold Cards

1 Put a mark on both sides of the paper 5 up from the bottom.

How to fold envelopes out of paper. Do this on all four sides you will need to turn the paper over to get the angle cut on the other side correctly. If they dont or look uneven simply trim until they fold neatly. How to make paper envelopes.

Remove the invitation and fold the top and bottom in. Start at the line of your crease and cut a corner. Next fold the bottom flap up on its black line and fold the top flap down on its black line.

Lay your invitation in the middle of your paper and fold the paper in on all four sides. Fold down the top to make a flap. 2 Fold the paper at the marks.

Cut out on the trace line. Tape together the open left and right sides. 3 Fold the leftover paper over the top of the other fold.

TipMake a sharp crease by. Glue the flap to keep your message enclosed. Fold the left side in the same way and unfold.

Fold in Three Corners Fold three of the points toward the middle. 4 Mark an inch inside each of the folds. Fold the right edge of the bottom section inwards aligning with the crease you just made and unfold.

Take the piece of paper you want to be the outside of the envelope place it decorative-side down and rotate it so that it looks like a diamond. Turn the envelope with the printed side down. Trace the envelope outline onto your chosen paper with a pencil.

Folding Your Own Envelope -Origami Style. How to make a paper envelope How to Make an Easy Origami Envelope – YouTube. The points should meet in the center of the paper and should slightly overlap.

Beside above how do I make an envelope out of a4 paper. Fold back one side of the paper a few inches. 6 Draw a line connecting the previous marks to show where to make your cuts.

This will be the opening of the envelope and it creates a flap that can fold over. Fold the paper over evenly. Take note of the X.

5 Measure up 4 little notches towards the inside of the envelope and put a mark. Get a paper thats about twice as large as your desired envelope size. Fold the paper over evenly.

Fold the bottom corner up to the crease that is indicated. Folding a piece of paper into a secret note square is very fun and easy and is a simple way to pass the time in class. Insert the letter or card.

Take the triangle you have just made at the top and fold it down towards the main part of the envelope. I like to cut a few layers of paper. Tape together the open left and right sides.

Get a paper thats about twice as large as your desired envelope size. Cut out the cardboard template. Fold the four side flaps inwards and burnish the folds.

Now you can use this envelope pattern over and over because its nice and sturdy. Fold down the top to make a flap. Fold the Flaps.

Flaps over on the black lines. Check that all the sides of your envelope will fold up neatly.

Read more

How To Draw A Gun Step By Step

How To Draw A Gun Step By Step

You need a ruler because you will have to draw straight lines of the detailsThe basis is a simplified version of the gun with a grip and a gunpoint. A long-barreled cannon having a relatively flat trajectory.

How To Draw A Gun Step By Step
Pin On Drawings

Easy step by step how to draw Gun drawing tutorials for kids.

How to draw a gun step by step. The external part of the grip is rounded. In the same step we delete unnecessary guidelines in the area that was drawn. 10 Easy Animal Drawings for Kids Vol.

As we said earlier this is a very simple drawing. A piece of ordnance. It can be round or angular.

Draw corrugation by using inclined lines as in my example. Above the trigger draw the switcher of the safety catch. Another simple step in which we draw the trigger.

To draw a smooth and symmetrical rifle we first need to outline the main lines with the help of simple geometric shapes. Basis of the gun. How To Draw SPAS12 Gun Step by Step – 8 Easy Phase In this drawing lesson well show How to draw SPAS12 Gun step by step total 8 phase and it will be easy tutorial.

Draw the grip panel on the grip. Learn how to draw Gun simply by following the steps outlined in our video lessons. Draw two screws on the grip.

Any portable firearm as a rifle shotgun or revolver. The first step is known as the Grip and entails placing ones shooting hand firmly and securely down on the grip of the gun which is still in the holster while pressing the non-shooting hand against ones chest. A gun is a weapon consisting of a metal tube with mechanical attachments from which projectiles are shot by the force of an explosive.

OverviewHow to draw SPAS12 Gun step by step. The first step is to draw the handle the trigger and the central part. We continue to use simple lines and equally simple geometric shapes.

Draw the grim of your gun by drawing a rectangle below the image drawn in step 1. Try to repeat all the forms as you can see its pretty simple. How to Draw a Winchester Rifle.

Take the ruler and draw four straight lines to make a long barrel. Draw the body of the gun with the help of a rectangle. Draw out the trigger guard.

Divide the top rectangle in the middle. Draw curved lines at. Draw a perpendicular line in the lower half about 13 of the way down the rectangle.

This tutorial will teach you how to draw a shotgun. You can refer to the simple step-by-step drawing guide below Step 1. It was the drawing lesson about how to draw a gun for beginners.

At the left draw hammer for your firearm. To the right side of the trigger draw the button of the magazine. Step two is lifting the gun straight up and out of the holster.

Point where 2 rectangles are meeting draw trigger and the guard for it. 1 Step by Step Drawing Tutorials How to Draw Cute Animals. Carefully draw the barrel high sight and handguard.

Now we need to draw a fuse and a drum. Draw a sight at the top of the gun and hammer at the rear part. Starting from this step we will use clear and dark lines to draw out the details of the rifle.

Cut the segments of the gun.

Read more