These Paper Can Cut Into Vatious Shapes By Scissors

These Paper Can Cut Into Vatious Shapes By Scissors

These Paper Can Cut Into Vatious Shapes By Scissors. A strip of wrapping paper (or paper) is a great starting point for practicing line awareness with scissors. These paper trees are so delightful, and not too difficult to make.

These Paper Can Cut Into Vatious Shapes By Scissors
Are There Different Types of Origami? from tactilehobby.com

These scissors are very versatile & can be used to cut paper, fabric, photos, crafts & much more. 4.7 out of 5 stars. For example, you could easily make the long row cuts from this set of free printable functional vertical flag checklist stickers with a paper cutter, then use small scissors to cut out the notch on the bottom of each sticker.

Read more

How To Fold A Heart From Paper

How To Fold A Heart From Paper

How To Fold A Heart From Paper. Insert the very tip into the slot. Easy origami double heart step 1.

How To Fold A Heart From Paper
zakka life Craft Origami Heart Valentines from zakkalife.blogspot.com.au

Then, take the now bottom of the heart and fold it up a third of the way. Fold in the sides a little so it is less pointy. Fold up the left and right sides of the rectangle so the edge of the paper meet at the middle.

Read more

Rectangle Paper Fold

Rectangle Paper Fold

Rectangle Paper Fold. Folding a piece of paper into ten squares may sound confusing but its actually very quick and easy. Fold a six pointed star from rectangular paper.

Rectangle Paper Fold
Make a Rectangle Paper to a Square Paper 5 Steps Instructables from www.instructables.com

Fold the top and bottom edges to the center of the square. Learn how to fold and cut a rectangular piece of paper into square. Fold the right half upwards so.

Read more

How To Make A Purse Out Of Paper

How To Make A Purse Out Of Paper

These ideas are not only easy but clever and genius in different ways. 1769 free craft tutorials on how to make pouches purses wallets at home including how to stitch a knit or crochet pouch how to make a cassette tape wallet how to make a pouch purse or wallet and how to sew a leather pouch.

How To Make A Purse Out Of Paper
Pretty Paper Handbags Using 12×12 Paper Youtube Handbag Card Paper Purses Paper Purse

The use scissors to cut on those same lines until you meet the short fold lines.

How to make a purse out of paper. You will find handbags clutches laptop bags and more great ideas. Similarly take a small piece measuring 77 cm. Paste these two paper pieces in the middle of the cardboard.

Trace the cover of your book on a large piece of paper making sure to MARK both ends of the spine of the book on your paper. A sum of money spoken of as the contents of a money purse. If you would like to make it taller you need to add more bands but if you would like to make it wider you need to add more pieces of folded paper.

Handmade bags and purses best tutorial. The strap is about 70 pieces of folded paper. Get out a large piece of paper or just tape two together like I have done half-assedly here.

He and his wife shared a common purse A small bag used esp. Mark the distance of 15 cm on it and use a cutter for easy folding Mark a distance of 1 cm as shown and cut it. Fold up your paper plate purse.

Draw a line across the bag from one mark to the other. He made the contribution out of his own purse. Place the bag flat on your work surface and measure down 6 inches on each side of the bag.

Today I am sharing some beautiful and useful tutorials to make handmade bags and purses. There are 6 bands they each have 60 pieces of folded paper. A great way to upcycle and avoid creating waste is to look around you for materials for gift wrapping.

How to Make Ladybug Paper Purse. Make a purse made from a paper bag. Magazines are folded to make a cool looking purse.

Here are some fabulous ideas for. Think taco shape here. Make some small cuttings at the corners.

Theres the old trick of using newspaper as wrapping paper but you can also get creative like this sustainable crafter who made gift bags out of old cereal boxes. Watch this video to learn how to make a cute paper bag purse and embellish it. Fold the edges of each side of the paper plate up toward each other on the long lines.

Read more

How To Fold A Piece Of Paper Into A Letter

How To Fold A Piece Of Paper Into A Letter

Other tutorials to check outWedding Anniversary Origami Card httpsyoutubeX6kQgPrBxysPlushie Keychain httpsyoutubeYizpae3MNkwDIY Gift card h. Defining a rectangular piece of paper with an X-axis parallel to a width thereof and a Y-axis parallel to a length thereof.

How To Fold A Piece Of Paper Into A Letter
Paper Folding Notes How To Fold Notes Crochet Key Cover Fold

Actual size starting from an 8 12 x 11 sheet of paper is 3 78 x 6 inches.

How to fold a piece of paper into a letter. 8 12 x 11 – Letter Fold – 3 panel F-1-F Cover Front Panel 3 5 8 5 6 1 Finished Job Size 3 11 16 X 8 1 2 11 163 11 F-1-B 3 5 8 2 3 4 3 11 3 11 16 Inside Cover Fold Fold FoldFold 8 12 x 11 – Letter Fold – 3 panel F-1-F Cover Front Panel 3 5 5 6 1 Finished Job Size 3 11 16 X 8 1 2 3 F-1-B 3 5 8 2 3 4 3 11 3 11 16 Inside Cover Fold Fold. At the open end of the paper cut a piece off bottom to top and hand it to the demanding man. They are perfect for sending invoices checks or other business letters.

Then crease the fold. Now thats after I wrote the directions but the third one you do shouldnt take you much longer. To mail you must place the lettehead head down face forward into the envelope.

Fold the Paper Toward the Center. Next you fold the top down and crease that fold also. A piece of letter-size paper folded in half makes a card thats sized 425 inches by 55 inches.

The tip of the triangle that appears on the left side should line up with the left edge of the paper. A piece of letter-size paper folded in half makes a single portrait card that measures 85 inches by 55 inches. Fold a letter Arrow Style.

Follow these visual instructions to fold a letter into a cute compact arrow shape. There was a man who sees another man with a ticket to heaven and the man demanded a portion of his ticket. Folding the piece of paper into an alphabetic letter at lines parallel to X-axis thereby dividing said piece of paper into a plurality of segments.

One way is to fold a sheet of the paper in the way you will fold it in the future put it in an envelope with the transparent window removed and draw round the edge of the window onto the paper. The 10 envelopes are designed to hold a standard 8 12 x 11-inch piece of paper folded into three sections making them ideal for offices. To fold the letter correctly you must take the bottom 13 of the letter and fold it upwards towards the letterhead – it should be folded about halfway to the top.

Take the left edge of the paper and fold the paper toward the center of the paper about one-third of the way. Hold the paper lengthwise and fold it in half side to side. Now fold the paper in half and hold it at the folded side.

A method for folding paper into alphabet letter shapes comprising. If you ever passed notes in class this folding method falls among some of the more sophisticated styles. The front of the envelope looks like a flat paper rectangle with two corners missing — but of course you can always stamp on it.

Unfold the sheet and you know where you need to have the address go on the page. Ubuntu 1410 Utopic Unicorn LibreOffice Version. See illustration below Tell the story As shared by Donald Burns.

Read more

How To Fold A Fortune Teller Paper

How To Fold A Fortune Teller Paper

Blow momdad a kiss. Boys may have been into them to but honestly I was too busy playing with my fortune teller or learning that Id be living with Paulie Shore and 7 little Paulies in a shack while playing a game of MASH.

How To Fold A Fortune Teller Paper
Folding Origami Fortune Teller Fortune Teller Paper Geometric Origami

Unfold and then fold diagonally the other way.

How to fold a fortune teller paper. The side with the desing should face the table. Open horizontally for the first letter vertically for the second and repeat until the entire word is spelled out. Flip over the paper.

Fold the paper into fourths. Flip over the paper the colored side or side with the fortune teller design should face the table. How to Use Your Origami Paper Fortune Teller.

Step 1 Place a sheet of paper on a flat surface with one of the short 85-inch sides nearest you. Slide your thumbs and pointer fingers under the squares to operate the fortune teller. Fold in half This is what you should see.

You may not have heard of a fortune teller before but that may be because you were never a ten year old girl. Fold the corners to the middle again. Take the corners and fold them to the center point of the paper where all the lines cross.

Once again open and close the mouth once for every letter of the word e. Do this repeatedly and crease the fold each time. Fold over the corners on the new side of the paper.

After 3 or 4 folds the paper should tear along the fold. Then intuitively select your second word from the words visible within d. Spell out B-I-R-D while opening the fortune teller once as you say each letter.

Do the same with the other 3 corners. So when my origami loving nephew decided he was tired of making Kusudama flowers. Make a blank fortune teller and ask your child to fill it with things they could do for mom or dad on their special day.

Then let them give their giftand follow through on the lucky parents good fortune. Fold the paper diagonally to form a triangle. Now intuitively select you third and final word from the visible words within the fortune teller f.

Help momdad with a chore. You can fold your own fortune teller paper crafts and have your friends choose their fortune by picking the colors and numbers written on the flaps. Push your fingers in and wiggle them to open up your fortune.

Fit your fingers into the slits and open. This is what you should see. Fold into fourths again.

Fold the fortune teller in half so the numbers face in and the square flaps are on the outside. After the last letter keep the paper fortune teller open. Fold them all towards the middle.

Fold into fourths one last time. Fold over the four corners evenly into the middle. Flip the paper over.

Fold the corners to the middle. Fold in half and unfold. Start folding bring one of the corners to the center of the paper.

Fold along where the folded down portion of paper and the rectangle meet. This is what you should see. Unfold and read the question fortune behind that third word g.

Read more

Make Sombrero Hat Out Paper

Make Sombrero Hat Out Paper

How to Make a Dutch Hat out of Paper November 4 2018 October 21 2020 In 2001 when I had to dress up my eight-year-old daughter Sara in Dutch costume for a third grade event I found instructions for a Dutch hat on an origami listserv. Leaving the paper plate rim facing the correct way a plate should the edges should be pointing up and curve down to the center hot glue the paper bowl face down to the rim it should make a dome shape not a dip shape.

Make Sombrero Hat Out Paper
Make A Papercraft Sombrero For Your Space Hopper Because It Obviously Needs A Hat Paper Crafts Sombrero Space Hopper

Heres What Youll Need for the Sombrero Hat with hanging pom-poms our favorite one A Paper Plate.

Make sombrero hat out paper. Wrap the scrapbook paper into a cone shaped hat and stick the tab in the slot. This would be a perfect way to make a sombrero. Prepare a large sheet of construction paper eg.

Draw a semi-circle with a compass if you dont have a compass tie a string to a pencil and anchor the thread in one spot. While the papier mache is still wet make small slits or tears at approximately 4-inch intervals around the edge of the brim. Explore the ASOS Style Feed to Browse the Latest Trends Styles.

Ad Discover The Collection Of Hats – Shop Top Designers And ASOS Design. First get hold of a piece of black construction paper. Plastic Solo cup or Hefty Cup around 16 oz.

Allow to cool and dry. I also hot glued under the tab to secure it once it was in the slot. Any colorful tall plastic cup should work for this craft.

Overlap the two sides of each slit and press to glue them together. Place the plant pot upside down at the center of your construction paper. Repeat for all slits to come up with an upturned brim.

The first step to make a witch hat out of paper is to get all of the necessary tools. Draw the brim and cut the two sides. When the hat is dry hot glue pom-poms in even spaces around the rim of the hat.

Draw a rectangle on the elongated corrugated circumference and 5 cm and the desired width. First we measure the circumference of the childs head and put 5 cm more. Use a pencil to trace the outline of the pots mouth on the paper.

24 x 36 to make into the sombreros wide brim. Red yellow or any festive color works best. Then cut out the semicircle and shape into a cone.

Ribbon or Yarn about 6 3-inch long pieces for each hat. Ad Discover The Collection Of Hats – Shop Top Designers And ASOS Design. Draw a circle on the cardboard to the extent that we will have taken.

Make a brim with the entire edge curled up. I did have to make my slot a bit longer than the template had. If you want to embellish your birthday hat further then do so now.

Explore the ASOS Style Feed to Browse the Latest Trends Styles.

Read more

How To Make Paper Dragon Claws

How To Make Paper Dragon Claws

Make a Dragon Claws. If you want enough to make 10 claws youll need 2 sheets of paper 2.

How To Make Paper Dragon Claws
How To Make Origami Claws From A4 Paper Youtube Origami Claws Origami Instructions Dragon Paper Crafts Origami

Pull the cord through almost all the way.

How to make paper dragon claws. One sheet of paper will make 8 claws. Make a Dragon Claws. Fold a paper in half lengthwise.

Origami Easy – How to make Dragon Claws Paper Ninja Star EASY TUTORIAL TheCrazyTutorials. Take the top left corner and fold it all the way over to the right to form a triangle. I cut the hangers to size.

1 Use firm clay. By libertyshouts in Craft Paper. Next Ill make the basic fingers for my wings and the toes.

I really like the way phone book paper compresses allowing for a tight taper. Its reeli improved with video. Unfold it again and youll have 8 equally sized rectangles for 8 claws Cut along the lines to make 8 tiny rectangles.

Dragon Claws Or Dinosaur Claws. Take the first bit of Origami Dragon Claws Step By Step and lay it flat on top of the other pieces. Apr 4 2020 -.

SUBSCRIBE for more awesome tutorials. Fold it in half again. If youre folding it try to make it as straight as possible.

If using 2 colors make sure the combined section is about an inch from the buckle so that you can weave over it. – Magic Paper Channel. How to make origami Dragon Claws Halloween—–Thanks for watching DONT FORGET to SUBSCRIBE to all of my channels.

I make two squares out of A4 paper. One claw needs two square sheets 15×15 cm. Here are a few tips.

For this I use wire clothes hangers masking tape and a phone book. 3 Ways To Make Origami Paper Claws Wikihow. Hot dog way- as my son calls it 3.

Dragon Claws Tutorial Httyd Amino. Dragon claws are a pair of metallic claws made from dragon metal obtained as a rare reward for completing a raid in the Chambers of Xeric. Easy Origami Witches Claws Folding Instructions.

THEY EASY AND FUN TO MAKE. In this video you will learn How to make Dragon Claws Ninja Star with Paper. Take the left bottom corner and fold it up to meet the bottom of the triangle.

This is a better version of my earlier instructables. In 0303 its NOT a perpendicular. I twist the paper around the wire and tape.

I think more people. 2 When forming the claws to your fingers dust your finger with corn starch so that the clay doesnt stick. Paper Mache Projects Ideas Kids Model Dragon.

Apr 4 2020 – Hi guys. Fold it in half again. It slightly tilted to the right.

Thank You For Watching. How to make dragon claws out of paper – YouTube Paper dragon craft Origami crafts Origami dragon. If the clay is too soft and squishy roll out a sheet and press it between two sheets of paper for a little while.

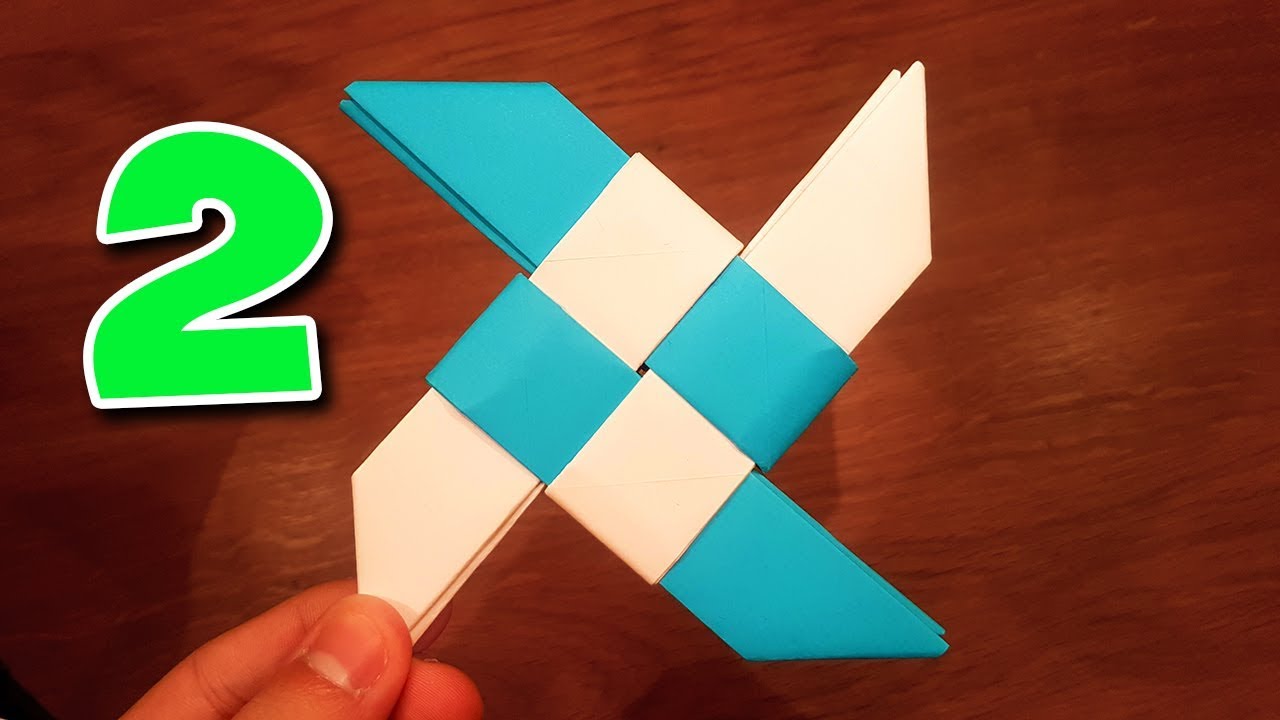
Take the top right corner and fold it down to match the top edge with the left side of your sheet of paper. Origami Monday Tutorial How To Make Dragon Claws. Jul 25 2016 – How to make Dragon Claws Paper Ninja Star shuriken 14 pointsNote.

Origami Claws 11 Steps. Paper Creative Master – httpswwwyoutubec. Thread the 2 ends of paracord through the bottom side of the buckle.

Do the same with the right bottom corner. 32 Tender Warnings How To Make A Paper Dragon That Looks. Once you have folded your Origami Dragon Claws Step By Step and it is ready to lay out in its new location set the plastic wrap around it so that the paper does not move.

Equipping them requires level 60 Attack. Note the brown tinge perfect for dragon claws and teeth. These claws are easy to make.

They are also temporarily obtainable from objects opened with bloodier keys during a game of Last Man Standing. Dragons Claw Press Paleoadventures. With the cord you just pulled through pass it through the loop then pull tight.

Read more

How To Make A Ninja Star Out Of Lined Paper

How To Make A Ninja Star Out Of Lined Paper

– must construct star out of folded paper – must follow form of current world record holder – must provide video evidence. After you complete one rectangle do the opposite for the other rectangle.

How To Make A Ninja Star Out Of Lined Paper
How To Make A Paper Ninja Star 2 Shuriken Origami Youtube

Now fold the corners into the center crease.

How to make a ninja star out of lined paper. You need one piece of paper. Shoutingforha You can make throwing stars out of a variety of papers. Your paper should now have a Z shape.

Unfold this so you have a crease. Origami How To Make A Magic Paper Ninja Star. Make incredibley cool ninja stars out of 2 pieces of paper.

It should make a backwards R shape. Crease the fold with your finger nails and move on to the next step. To create a two-tone ninja star like this one fold one sheet with a mountain fold and the other with a valley fold.

Now flip this over and fold over the bottom of the paper. Now tear or cut off the chunk on the right then unfold the triangle and a square is revealed. You could also use two different coloured sheets.

Tape a string at the back and hang your layered star for a lovely star ornament. Now take the lower left corner and fold it up to the middle crease. First you need to make it square.

Cut it in half. How to Make a Ninja Paper Throwing Star. Fold a right triangle as shown in the pictures below.

It can be any size. Flip your completed dollar bill shuriken over and thread a wide grosgrain ribbon through the back. To make an 8 sided ninja star first you need to take a sheet of the paper you are using and fold this in half the short way.

Take one of the rectangles and grab the upper right corner of the piece of paper and fold it down to meet the middle crease. You can even use sticky notes. Embellish the center with a button paper cut-out pom-pom or beads.

Press the entire throwing star with your fingers to make sure that the creases are smooth. Make a cool and easy paper creation with only 8 squares of paper and your hands. Create stars of different sizes.

Alternate money origami ninja stars with stars made from regular origami paper to make a garland of the desired length. Do this to the top corners. Layer two or more stars.

Start out by laying your paper down and making a diagonal fold so the top and side of the paper match up this should create a right triangle with an extra long bottom. Make it into a square. Then flip over the paper and fold the extra flap down so it matches up with the bottom of the triangle.

Making an origami ninja star is easier with square crisp origami paper than it is with money. Once youve got two 21 pieces fold them in half so that you they are are 41 in size. Glue together two or more stars for a layered paper star.

Read more

Teh Basic Paper Airplane Steps

Teh Basic Paper Airplane Steps

Be careful with the ones that are pointy they can hurt. Next fold the top corners on both the right and left sides to line them up with the middle crease.

Teh Basic Paper Airplane Steps
Paper Airplane Template Paper Airplanes Instructions Paper Airplanes

First fold the paper in half length ways.

Teh basic paper airplane steps. Start with a letter size sheet. INSTRUCTIONS Flying tips at the end of the page Your browser does not support the video tag. Select a plane below and lets get started.

Fold the wings down to meet the bottom edge of the planes body. Fold a corner into the middle of the paper. Paper Planes have been providing quick and easy fun for generations.

These beautiful easy to follow paper airplane folding instructions can be downloaded and printed as many times as you want. Fold the paper exactly in half along its edge. Unfold the wings so they are perpendicular with the body of the plane.

At this point this should look very similar to the most basic paper airplane design. -UPDATED and SLOWER VERSION OF THIS VIDEO H. Select the plane you want and get ready for takeoff.

Fold the wings down to meet the bottom edge of the planes body. Take a standard sheet of 8 12 x 11 inch piece of paper. This paper airplane DIY is another basic set of step by step instructions to make a simple and basic paper airplane to start off with.

Just fold an 85 x 11 sheet of paper in half down the center like pictured and then open it up again so that it lays flat. How to make a good paper airplane. At this point you have a fully functional paper airplane.

Fold the top edges in so that they line up with the center line. Fold in in half long ways then unfold. HOW TO MAKE A PAPER AIRPLANE EASY – Make a classic dart style paper airplane with this step by step tutorial.

Unfold the paper and repeat for the left corner. Paper Airplanes are fun and educational. Again make sure your plane looks somewhat like the pictures.

Fold the plane in half. Fold the plane in half. I drew a line on the center crease to make it easier for the kids to see but that is optional.

Fold the upper corner down so the upper left point hits the center line crease. Unfold after the crease has been made. You could end here if you wanted.

We provide detailed instructions and video tutorials to help you make over 50 different paper gliders darts and long distance flyers. Create fun and simple paper airplanes. Unfold the paper again and fold the top right corner over to meet the crease made from the first fold.

If you find your plane spinning out of control and would like to give it some more stability go to the next step. Add Tip Ask Question Comment Download Step 2. Fold the top point down so that it touches the bottom edge of the paper.

Start by folding the paper in half the long way. Most planes are best indoors but some will surpise you outdoors. Simply fold the paper in half vertically unfold the paper to see the crease and then fold each of the top corners down to that center crease line.

The edge should line up along the center crease. Fold the top right corner over to the left side making a fold from the top of the paper to the bottom right corner.

Read more