Scissors. These instructional animated slides teach you how to easily fold a panda Japanese style.

Easy Origami Bear Panda Bear Polar Bear Brown Bear Red Ted Art Make Crafting With Kids Easy Fun Origami Bear Origami Panda Kids Origami
A cute little panda bear you can easily make in a couple of minutes.

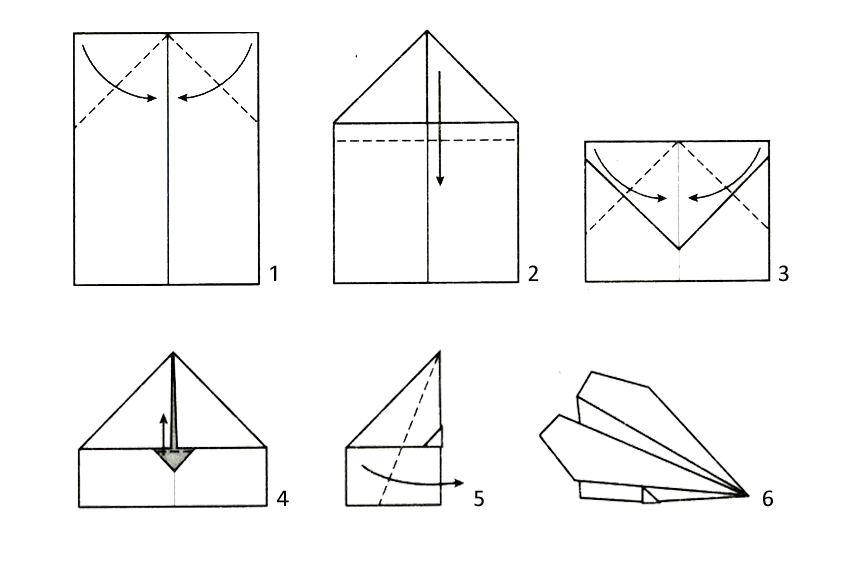
How to make origami panda bear. What did you think about this origami panda. Step 2 Fold both sides in along the dotted lines. Traditional Japanese origami is the art of paper folding but 3D origami is a little more complex a little more challenging.
About half a centimetre. This Paper Bear DIY can be turned into a brown bear Panda Bear DIY or Polar Bear Craft too. Apr 9 2017 – Origami is the traditional Japanese art of folding paper to make models of plants animals daily-use tools and amongst othersチャンネル登録してねPlease SubscribeIf.
A little more interesting. White paper eg from the printer some black paper or a black pen. Step 5 turn the paper over.
Flip the paper over to make an upside down pentagon with two tabs sticking out at the sides. Ad Learn Origami online at your own pace. Step 6 fold the top of the paper down along the dotted line.
To begin making your panda start with the black side of the paper face up. How to make Origami Panda Jacky chan – YouTube Bear origami Origami animals Origami. You will need a square sheet of origami paper that is black on one side and white on the other side in order to make your origami panda.
Please keep in mind that larger paper tends to be easier for a beginner to fold. We used a sheet of paper 15 x 15cm to make our Origami Pole Bear and friends. Making an Origami Pop Up Bear Card – Pop up bear card origami craft.
See how to model and fold a 3D panda bear with these origami instructions. To make your easy Origami Bear you will need. This step by step tutorial will show you how you can easily make an origami.
Origami Paper Folding Panda Bears Model Directions – Panda bear origami craft. Easy Origami Bear. Fold each layer back on itself a little way.
Step 1 Fold and unfold the paper in half both ways. Origami Panda Bear. This origami video tutorial will teach you how to origami a 3D panda.
Fold the top layer back on itself to make a. Apr 9 2017 – Origami is the traditional Japanese art of folding paper to make. Fold the top and bottom edges to the center then unfold.
Ordinary origami paper or kami is fine for this model. Basically we folded down an A5 sheet of paper. How To Make An Easy Origami Panda Bear – YouTube.
Fold the left half to the right then. Learn how to use the Japanese art of origami to make your own panda. Join millions of learners from around the world already learning on Udemy.
Step 3 Fold and unfold the bottom and top along the dotted lines. Start today and improve your skills. Find the two layers of paper at the bottom corner.
Be sure to check out Joels definition of a valley fold and a mountain fold under the instructions. As its a panda the paper should be black on one side and white on the other. Fold down in half and unfold.
Step 8 fold and unfold the paper in half and leave slightly folded to give a 3d look. This is the main origami bear face. This origami panda bookmark is made.
How to make an Origami Bear Panda Bear and friends. Two 15cm x 15cm 6in x 6in sheets of kami will produce a model that stands 11cm about 45in tall and is 8cm about 3in wide. The paper used in this example is 6 inches square.
Use the start stop forward and back buttons to easily follow along. Step 7 fold the paper up along the dotted line. This is a cute little origami bear I think youll like.
Learn how to fold an origami panda that can also be used as a bookmark. You wont need a panda bookmark template as these are so easy to make. How to make a cute Origami Panda.
The full instructions and diagrams for this loveable Origami Panda Bear are contained on the printables page. Diagrams for each origami works are printable on B5 and A4 paper. Giant pandas live in broadleaf and.
Step 5 Turn the paper over. It needs two sheets of paper one for the origami panda head and one for the body. To make your easy Panda Origami Bookmarks you will need.
Step 4 Fold the paper behind along the dotted line. Folding an Origami Pureland Bear – Pureland bear origami. Love this cute and easy Paper Bear DIY.
A square sheet of paper. Step 4 fold the paper behind along the dotted line. This craft is best suited for the more experienced or teen crafter.