How To Make Origami Origami

How To Make Origami Origami

These are the two basic folds in origami. Origami animals are a popular choice of origami.

How To Make Origami Origami
Diy Ice Cream And Paper Folding Image Cute Origami Kids Origami Origami Patterns

Origami is fun easy inexpensive and great for sharing with others.

How to make origami origami. The origami instructions at Origami Guide are presented in a clear simple photo tutorial format. We have lots of beginner easy intermediate advanced level origami models. Theyre fun to fold and its really cool to see them begin to take shape and look like their real life counterparts.

Simply click on a model to view the diagrams. Make an Origami Cube. Now that you have a loop feed the top end behind and through the hole.

Flip the sheet so that the colored side is face down. Pretty much every fold is either a mountain fold a valley fold or a combination of the two. Ad Learn Origami online at your own pace.

How to Make Origami Animals. Start with a square 6 x 6 15cm x 15cm origami paper. Now make two mountain folds as shown.

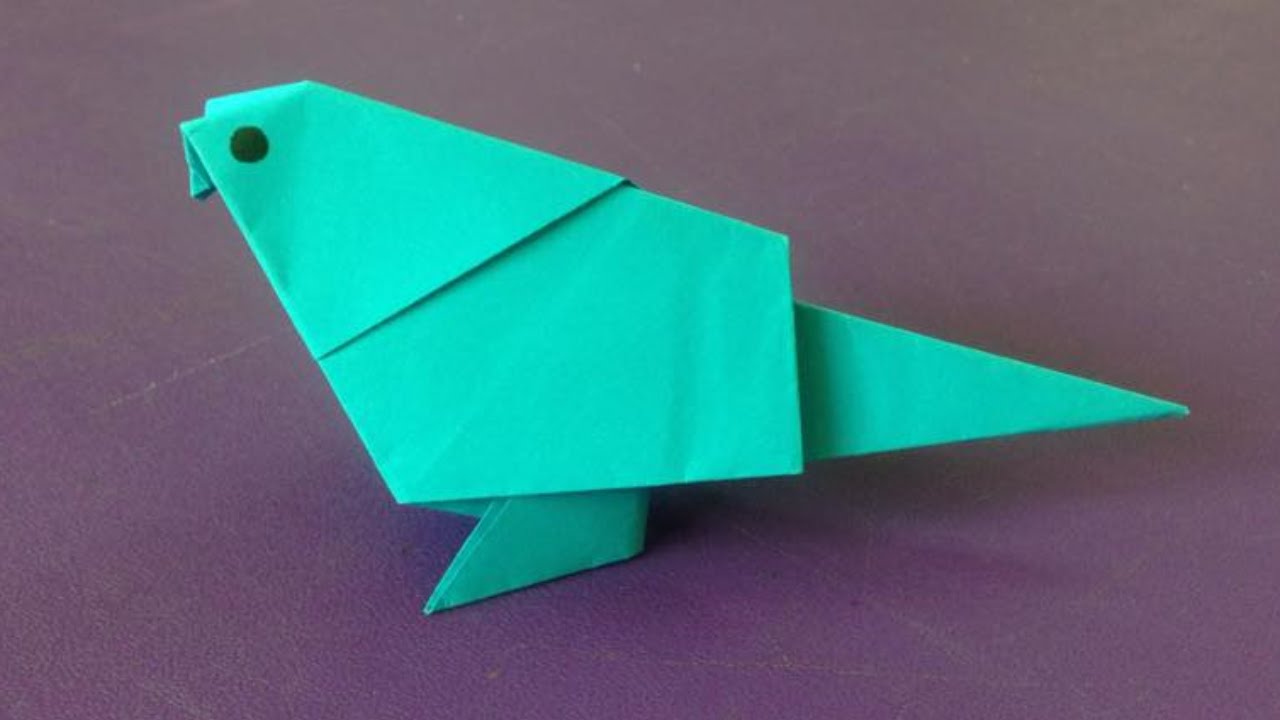
Youll find a great resource of origami articles right here. There are many kinds of origami birds you can fold and these are some of the coolest ones available. Even if youre a complete paper folding beginner you should be able to fold most of whats here.

Fold the bottom left corner to the bottom right corner making a smaller triangle. Show Off Your Origami. This is the front of the origami paper.

Every crease needs to be flattened quite well for a successful model unless of course the instructions tell you not to crease it well You can reinforce a crease by running the side of your thumbnail along the fold or even use some sort of tool. How to Make Origami Birds. If you have made a piece of origami that you want to share everyone would love to hear about it.

Start today and improve your skills. Follow our instructions to make something today right now. Join millions of learners from around the world already learning on Udemy.

Lets make sure that. Origami is such a fun activity for kids adults. Fold the paper in half diagonally to form a large triangle.

This is an activity that has been passed on from one generation to another despite huge technological advances. Bring the right end of the paper over and down. Bring the bottom end up and over the left end.

To do the blintz fold fold the piece of paper in half diagonally from both directions. First construct the blintz fold which is the foundation for many popular origami projects. You Might Also Like.

Learn how to make origami birds with these easy to follow instructions. Start with your strip of paper color side up if youre using colored paper or origami paper. Take the piece of origami paper youd like to use for the flower.

Fold each crease very well. This is the back of origami paper this color wont be seen start this side up. Learn how to do origami with our easy to follow step by step origami instructions.

Once youve made the blintz base fold each corner of the base inward to the center. There are instructions for various origami animals so just choose your favorite one and start folding. Start by clicking one of the links below or choose a topic from the left navigational bar.

Below youll find instructions for 120 easy to fold origami models. Then unfold the paper and fold each corner into the center. Starting with the paper rotated to a.

With a Valley Fold the crease bends the paper up. Lie it on the table pattern or color side down. With a Mountain Fold the crease bends the paper down and the crease resembles a mountain.

Using the mountain fold lines as guides fold the four corners of the paper into its center.

Read more

How To Make A Gargoyle

How To Make A Gargoyle

See upgrade notes at bottom of post. Cheats on how to create gargoyle.

How To Make A Gargoyle
Middle School Grades Art Lesson Plans Grade 6 8 Ages 11 14 Years Middle School Art Lesson Plans Middle School Art Lessons Middle School Clay Art Projects

You made the best community Apr 28 2019 30801 GMT -6 Ordias.

How to make a gargoyle. Gargoyles are Slayer monsters located in the Slayer Towers top floor and basement requiring 75 Slayer in order to be harmed. It can be made into twenty Gargoyle scroll Hammer Rocks by using it on a summoning obelisk. Based on OpenWrt 1806 02212019.

Fill a shaker with ice cubes. The Gargoyles use a variety of recycled materials including newspaper cardboard and plastic water bottles. Make it 2 inches longer and wider than your prototype.

New stable version 12032019. The roll is Intelligence Occult difficulty 9 one for each donor after the first. From this point a mold was made and a plastic shelled foam replica was made.

A single success allows the creation of a Gargoyle. The gargoyle makes two attacks. If they attempt to kill them off.

Those found in the basement are only available to players who are assigned gargoyles as their Slayer task. On top of the newspaper form a bed of plasticine for your gargoyle prototype. This includes wedging and kneading their clay if necessary creating a hollow form using the pinch pot technique and building onto their gargoyle in order to meet the requirments.

If the Voice of Seren is active in the Amlodd Clan district in Prifddinas using the Prifddinas obelisk will give 24 scrolls per pouch. External Plugin Root bug fixes blocks the use of inappropriately formatted drives Read More 111 comments. Available on Android iOS.

Students create their gargoyle. 5 1d6 2 slashing damage. Shake and strain into a cocktail glass.

They begin with a chunk of clay and should utilize the techniques they were taught to build from clay. The body of the gargoyle was made from the parts of two plastic injection molded skeletons. Contains all of possible combinations.

First the skeletons were completely disassembled and the flashing from the molding process was cut away with a combination of a xacto knife and a dremel grinding tool. Cognac Gin Triple Sec. Lay down two layers of newspaper over your work surface.

5 1d6 2 piercing damage. An unliving womb reduces the difficulty by 4. 4 to hit reach 5 ft one target.

Hey all just a reminder I still have the discord channel running so if you are looking to talk with or find out where other old Shazzy Shard players are playing drop in. You need to have parent items discovered to succeed. The basic blood cost of the ritual is 5 points for each Cainite used in the Gargoyles manufacture.

The basic concept involved creating each piece body wings legs claws individually then assembling the completed pieces into the desired form or pose. One with its bite and one with its claws. Stick plastic coffee stirrers or craft wire into the body of the gargoyle to create projectiles on which wings tails ears spines a tongue teeth and appendages can be built then layer on sheets of paper covered by the papier-mâché-and-glue mix to fashion the details of the creature.

4 to hit reach 5 ft one target. Create the perfect Gargoyle with this step-by-step guide. Add an extra 5 points if the caster wants the Gargoyle to be fertile.

Make it half as deep as your prototype. The construction was spread over four separate sessions each lasting three hours.

Read more

How To Make An Origami Flower Easy

How To Make An Origami Flower Easy

In the original video I followed they used a toothpick to roll down the sides. Start with a square sheet of paper with the color-side up.

How To Make An Origami Flower Easy
Cards Crafts Kids Projects Easy Foamiran Flower Tutorial In 2021 Origami Crafts Paper Roses Paper Rose Craft

Origami flowers are a lot more affordable than real flowers and last a lot longer however they dont smell as sweet Follow the step by step photos and origami diagrams and fold the origami flowers.

How to make an origami flower easy. Fold the paper along the diagonals in both directions. Flower origami production stages Lets cut 5 pieces of 10 x 10 cm with colored papers. Try creating them in a few different colors and.

Try giving them to someone they will be fascinated with your origami flowers and the effort you took to make. Lets fold the edges so that they meet in the middle. This means that there are actually 60 petals in total.

First construct the blintz fold which is the foundation for many popular origami projects. Take the right corner and bring it over to the left make a. Fold the bottom corner up to the top corner and crease well.

Make a diagonal crease from the left point of the outer triangular flap at about a 4 oclock angle and then reverse that fold. I personally found folding the sides easier and equally as effective. Fold the paper across the diagonals of the squares to let it stand up.

Fold the paper fully over the diagonal. Here is a list of easy origami that anyone can have fun making. This traditional origami lily flower looks lovely on its own or in a bouquet with other origami flowers.

Some origami flowers are easy and some are more advanced but I made sure to do my best to make the instructions as easy to follow as possible. How to Make an Easy Origami Flower Stem Start by folding a larger sheet of green origami paper diagonally to get a triangle shape unfold. Fold Down the Sides to Create Petals the Twist Some More to Shape the Flower Nicely.

You will need to apply squash-fold to make this flower. Fold the corners to the middle middle is indicated by the diagonal fold you previously made. To make a simple origami lotus flower youll just need one piece of square paper.

Divide the base into 4 equal squares. Then unfold the paper and fold each corner into the center. Youll have tons of fun while learning how to fold lots of origami.

Fold the left sections over to the right pushing the central crease to make it easier. This will make in total about 12 flowers. Instructions for Simple Origami Flower Step 1.

Click on the diagram you want and start folding. This is the back of the paper which is usually white. Youll be able to fold many origami models in no time.

Ive made plenty of instructions and diagrams available for a variety of flowers. They can be perfect gifts or used as festive decorations. This origami daffodil makes use of regular hexagon to produce a six petal flower.

This six-petal flower is made with three rectangular units tied together with a piece of wire or pipe cleaner. Our simple step by step guides are easy to follow. Then hold the sides and fold them towards the centre.

You can make as many flowers you want but each of them will have 5 petals or these shapes as seen below glued together. Next lets take one of the square pieces and fold it into two triangles. Fold the top sections down on all of the other sides.

We have a lot of easy origami models for you to choose from. To do the blintz fold fold the piece of paper in half diagonally from both directions. We did this step to mark the diagonal center.

This origami lily flower is easy to make with one sheet of square paper. Origami flowers are usually easy to make and have the added benefit of not wilting as quickly anyway as natural flowers. The main things to keep in mind about the final origami flower are.

Read more

How To Make A Lily Pad Flower Out Of Paper

How To Make A Lily Pad Flower Out Of Paper

Trim these ends into points too. Steps Download Article.

How To Make A Lily Pad Flower Out Of Paper
Origami Water Lily Origami Lily Origami Water Lily Origami Flowers Tutorial

Grab all the simple materials and download my template.

How To Make A Lily Pad Flower Out Of Paper

How to make a lily pad flower out of paper. Easy craft Subscribe to my channel enjoy more videos. Download and cut the paper with my template. Decorate the lily pad and frog.

Then cut out your handprint. Trim the ends into points. A page with one.

How to Make a Paper Lily. The underside of a lily pad looks vastly different than the top. Fold the folded strip in half and cut it along the fold line.

Use a square piece of paper. This instructable will show you how to make a lily out of paper. This oxygen is transferred to the water lilys stem and down to the plants roots.

This would be a great take home favor for a spa themed party a frog princess. In this printable download you will receive 3 pages. First you fold it in half and then fold it in half in the other direction.

Cut a notch on both sides of the middle of the shorter strip and tie with string. In order to make it you will need a piece of paper any size. You can use all one color paper and make a variety of flowers or use multiple colored papers for the various flowers.

Once you master this origami lily you can try to make more paper flowers like an easy origami tulip flower or traditional origami camellia. Carefully set the flower on the waters surface and wait to see what happens. When grouped together the origami flowers look very lovely as a bouquet.

Start by tracing the outline of your hand onto the printer paper. They will open up faster than new ones. Fold it diagonally one way and then the other diagonal way.

Wrap the flower with wire gauge 20 by floral. If you have any pencil marks showing on the paper just use an eraser to carefully erase them. The flowers shown here are made with white wax crayons and watercolor.

Make the petals from printer paper. If you are giving away cookies wrap the plate with cellophane before you wrap it with the tissue paper. Glue the petals with the stamen.

Fold the paper lengthwise into 1 accordion pleats. 1 Video tutorial to make paper Lily flower. Stick the paper spring to the lily pad and stick the frog to the spring.

Open up the paper and push the diagonal folds inwards slightly so. These tubes which are connected to openings called stomas in the top of the leaves help the pad float and collect oxygen through the stoma. Slowly your paper flower will open up like a real water lily blossoms.

In this Arts Crafts video tutorial you will learn how to make a lily flower from folded paper with origami. Open out the pleats and begin gently lifting each layer of tissue paper. A system of stems and tubes run underneath the lily pad.

Fold in the corners to the middle where the diagonal creases intersect. 2 Step by step instruction to make paper Lily flower. Then fold it again across the other diagonal.

DIY paper Water Lily. For this you need a square sheet of paper. Ive cut leaf details from a different coloured piece of construction paper.

Fold in the corners two more times. Let the wet flowers dry on a plate afterward and use again. Cut out the shapes.

Dec 9 2016 – Here is a printable water lily template you can use along with the printable frog lily pad shapes I just posted. Trim the faux flower from its stem and glue onto the top of the tissue paper. 1 Step by step instruction to make paper Easter Lily flower.

Make a bouncy paper spring by sticking two paper strips at right angles to each other and folding over each other until it becomes a spring. Next you fold it diagonally across to form a triangle.

Read more

How To Make A Paper Dove Origami

How To Make A Paper Dove Origami

Although traditional origami always begins with a square sheet of paper and involves no scissors the dove is a variation using round paper and cutting it twice. CRAFT TEACHER KATE SMELTZER SHOWS YOU HOW TO MAKE AN ORIGAMI DOVE IN AN EASY TO FOLLOW ONE TO ONE VIDEO CLASS.

How To Make A Paper Dove Origami
Origami Dove Printable Instructions Origami Bird Easy Origami Dove Origami Instructions For Kids

Fold the paper in half left side on top of right side.

How to make a paper dove origami. For the leave use a 1 x 1 inch square of card stock paper. Soon youll be making all sorts of cool origami creations. Check out this video to learn how to origami a dove.

Fold a round paper doily exactly in half. Where you need to fold. Today I am sharing a beautiful Origami Bird making tutorial.

This is the front of our origami paper the dove will end up being this colour. Start today and improve your skills. Educational video for children – YouTube.

2 Make sure your paper is flipped to the back of the origami paper sometimes white. Fold the right point over to the left point. Fold at about ⅓ of the distance from the folded edge.

Origami a dove turn it into a Christmas ornament How To. Crease the fold well and unfold. The model is now a half circle.

Starting from a square cut off a strip 14 of its side for an adequate rectangle. If you liked this origami dove you may also want to try other origami pieces such as an origami 5 petal flower. Wrap the tail around the body.

Origami a Peace Dove. Fold and unfold the paper in half as shown. If playback doesnt begin shortly try.

42508 1252 PM. WHAT YOU WILL LEARN. Origami war is pointless and hurts everyone.

Paper Bag Dove Craft – Make a Dove from a paper lunch bag white paper a printer crayons scissors and glue. Ad Learn Origami online at your own pace. Paper Dove – This video tutorial shows you how to make a Dove from a paper.

Make sure your paper is flipped to the back of the origami paper sometimes white. Fold the tail to meet the vertical line. Origami Dove – This is a video tutorial on how to fold a Dove using only a piece of paper.

Fold the bottom point up to the top point and crease well. The Origami specialist Kate Smeltzer shows you all the steps to create a dove out of a piece of paper. Here is a demonstrational video on how you can fold your very own origami peace dove to help stop all that wanton paper cut violence.

Craft a ferocious origami eagle for intermediate origami students. Its very easy and simple Paper Bird making instruction. What tools you need to make origami.

Fold the half circle in half again. If you want to read similar articles to How to make an origami Dove we recommend you visit our Art handicraft category. Origami a Peace Dove How To.

Use it as a Christmas homemade gift. This is the front of our origami paper the dove will end up being this colour. Tips and suggestions to make this origami Peace Dove.

How to make a paper dove with flapping wings – origami tutorial. White paper has a beautifully crisp and snowy effect. Now you have completed your origami peace dove.

Try vellum or translucent paper as well. Open the tail out and reverse fold the last crease. Use a rectangular piece of paper US letter size or International A4.

Fold the top layer back towards the left. Join millions of learners from around the world already learning on Udemy. Instructions for Origami Dove.

If you had some trouble following along start. The folding instructions for this pretty origami dove actually a kirigami dove as paper cutting is involved can be found at wwwactivityvillagecouk. Are You Ready to Try Grammarly.

Fold one of the wings up and repeat on the back.

Read more

How To Make A Swan

How To Make A Swan

The swan is a symbol of elegance and makes a great addition to any cake or table. To make a paper swan start by grabbing a square piece of paper and folding it in half diagonally then opening it back up.

How To Make A Swan
Diy 3d Origami Swan Tutorial How To Make Easy Origami Swan Paper Crafts Swan For Room Decoration Youtube Origami Easy Origami Swan 3d Origami Swan

2 Place water and butter in a pan and bring to boil.

How to make a swan. This is the front of our origami paper our swan will be mostly this colour. Then pull the neck of the swan away from the body. Decide on a position for the swans neck and then crease.

Take the bottom point of the kite and fold it up to the top point then fold a small portion of the thinnest point and fold 1-2 cm back down. To bend was so as you need to insert into the stiff wire or rod. Cut your sheets of paper to give you 288 rectangles 270 of which you will use for your 3D origami swan.

Until the cup is 50 full. 3 Now you can make 3D origami triangles that will be the basis of your entire creation. Flip the paper over to the back origami paper is usually white on this side.

Cut out of cardboard wings and tail more paste in place check with all photos. If you are interested in cake decorating and sugar craft check out this great video that will teach you how to make a swan out of sugar. Fold the top side the swan head side in half lengthwise backward.

To implement the idea it is necessary to prepare. Step 1 Fold the paper in half and then unfold it. If youre new to paper folding we recommend that you take a look at our Beginners Guide which will show you all the basic skills and techniques.

Cut small pieces of paper and use white glue paste over all parts of the future for the garden crafts. Fold the paper in half again along the middle crease then pull up the thinnest point of the triangle to unfold the swan. Then fold the swan in half vertically.

You can make an original swan from a tire plastic bottles and a corrugated hose. How To Make An Apple Swan. If you ended up with a bit of a mess dont worry.

You might want to keep just a second pause in the pouring after the brown cup phase so that the surface of the drink sets up a bit – making it a bit firmer and that way the pattern wont spread uncontrollably. Fold the right point over to the left point creating a central vertical crease. Step 2 Fold both sides in to the centre along the dotted lines.

1 Preheat oven to 210C 410F. Once a swan has her own cygnets they will start in. To extend the swan neck using a flexible tube.

Once they were firm enough to hold their shape but still be molded I used some melted chocolate to attach it to my swan. Try cutting you apple at a slight diagonal so that it cuts through the centre of the apple core. Youll need a sharp knife and 2 butter knifes that will be your guide when cutting.

For each paper rectangle with the long edges at the top and. You should have a pretty origami swan that can stay up on its own. Swan made of tires and plastic bottles.

3 Turn off heat and add flour stirring with a wooden spoon until mixture comes away from sides. Corrugated hose you can use an old hose from a vacuum cleaner. I cut the wings out then let them sit flat on my counter for a few hours.

Make sure to provide your swans with a continuous supply of food or else they will wander away. Swans naturally fly away but they will keep on coming back if their usual place of stay has a continuous supply of food. While holding the bottom swan body down only pull the head and neck up.

Choose your apple preferably a big one would make it easier to cut up. Make a beautiful elegant swan out of sugar. For pictures of how to create the origami swan.

From there bring the 2 corners in towards the center crease to. Once your cup is about 50 full its time to start pouring the swan. These instructions will show you how to make an easy origami swan.

White plastic bottles with a capacity of 1 liter 35-40 bottles per one swan. For the wings I cut out a large piece of gumpaste to create a foundation to attach the gumpaste feathers I had made. Pouring the swan pattern.

Read more

How To Make An Origami Scythe

How To Make An Origami Scythe

If you are going to attempt to fold this make sure you use really large paper. Instruções OrigamiChallenge IdeasPaper ToysHow To Make PaperDiy PaperForkCard StockWeaponsAvengers.

How To Make An Origami Scythe
Pin On Paper Party

Some of the most beautiful origami are the simple models.

How to make an origami scythe. Start today and improve your skills. Its harder to design easy models than it is to design complex ones. Ad Learn Origami online at your own pace.

You need a 10 halberd scythes are halberd class in this game and the Soul of Priscilla. Here youll find dozens of step by step origami instructions to help you make the most beautiful designs. Make sure theres enough of the tube that you can hold it.

Take the larger square paper and roll it into a thin tube for the handle. We have a lot of easy origami models for you to choose from. Learn to make an origami balloon fold an origami heart assemble a senbazuru and much more.

How to Make a Paper Scythe Sickle Fork – Easy Tutorials. Here is a list of easy origami that anyone can have fun making. Insert the tube into the hole.

We made the Origami Cube and will be making lots more within the week. I was looking up folding flapping crane that Ive been trying to do on and off for 3 yrs or so. Step By Step Origami.

Firstly heres the Grim Reaper folded by Flicker user Tong Liu. Join millions of learners from around the world already learning on Udemy. Go to the Giant Blacksmith and choose ascend.

Every one contains diagrams and instructions explaining each step very clearly and they are all free. I love ur site. There are lots of origami models that are easy and fun to fold.

Learn how to make easy origami with these simple instructions. Start today and improve your skills. Wrap your hand around the section of the tube next to the blade.

So please have a browse and start folding. The construction starts from a square and uses triangle properties to approximate the necessary angles. Ad Learn Origami online at your own pace.

Lets take a look at some of these folded by different origami artists. You may need to open the blade a bit to allow the tube to fit. The beauty is in the simple folds.

Four Pointed Seashell Star. Join millions of learners from around the world already learning on Udemy. Now move to the right tab and you can forge boss weapons.

The photos are easy to follow and everything. Click on the diagram you want and fold away. Aug 2009 – This is a great site.

April 2009 – Amazing. Scythe as in sickle or grim reaper weapon About Press Copyright Contact us Creators Advertise Developers Terms Privacy Policy Safety How YouTube works Test new features 2021 Google LLC. Create art from the smallest scrap of paper with wikiHows Origami tutorials.

From paper boxes to tiny paper dragons our step-by-step articles and video animations will help you fold creatures and decorations tiny enough to fit in the palm of your hand. Easy Origami Boston Terrier. Because the pentagon is derived from a square this model could technically abide by pure origami rules but I cut off the excess paper as leaving it would have made it difficult to fold and left the model looking lopsided.

Enjoy the videos and music you love upload original content and share it all with friends family and the world on YouTube. People usually use paper thats at least 50cm x 50cm big and it could take you around 10 hours to finish folding it.

Read more

How To Make A Bird

How To Make A Bird

Mannie is escaping – from small town life from family mysteries from grief from her fragile former self. WildWatchCams Royal Society for the Protection of Birds Journey North.

How To Make A Bird
How To Make A Bird From Coconut Leaves Khmer Traditional Cambodia Youtube Coconut Leaves Leaf Crafts Palm Frond Art

To make moving birds all you need is a printer some paper scissors and some metal paper fasteners.

How to make a bird. Also the Bird participates in 41 combinations for receiving other elements. Pole Birdhouse Plan. Next cut 4 pieces of wooden trim and screw the pieces onto the underside of the.

This book is quite stunning – unique imaginative and hopeful – as a young girl gathers together all the things needed to make a bird – bones feathers eyes wings and so on and then the final component – breath to give it flight. 15×15 cmOther Bird Tutorials. This plan will build you a bright red church for your birds.

Print out a black and white red orange green or the blue. Little Alchemy Bird combinations. See also all other Little Alchemy Cheats on site main page there you can find simple elements search box.

How to Make a Bird by Martine Murray is a well-written coming of age story. A YA novel of rare sensitivity whimsical humour and revelation. A young teenage girl dealing with loss and the grief it brings sets out on a journey to discover exactly whats happened to her suddenly upended life.

How to Build a Birdhouse. Twigs leaves grass moss etc. Use this free plan to build a.

Natural Materials eg. Easy origami tutorialPaper size. Build your bird table.

With just one plank you can build this stylish birdhouse that will last for years to come. Any cheap piece of solid timber makes an excellent bird. McKinlays prose is lyrical and perfectly spaced to build tension and expectation.

Then cut out the bird partsthe head body legs and tail wing. Shes heading for the city in search of an elusive something to make herself feel right. We start the hands on part of this STEAM project by going outside and collecting a range of natural materials that the children think they might be able to use to make a birds nest such as twigs moss feathers grass etc.

Red Church Bird House Plan. To build a bird table start by trimming a large flat piece of wood down to your desired size to create the tabletop. The story moves at a pace to hold the readers interest.

Use wood that will not split or disintegrate when wet – exterior quality plywood from a sustainable source 05cm – 1 cm thick is ideal. In this simple game the Bird can be made with 4 combinations given below.

Read more

Make A Box

Make A Box

We work with top filament manufacturers to get you access to. If you already made a table with the drop-down entries click in the Source box and then click and drag the cells that contain those entries.

Make A Box
Box Template Paper Box Diy Diy Gift Box Diy Box

1 Choose a Plan.

Make a box. Then preview your game in real-time. The padding is transparent. Margins borders padding and the actual content.

The only limit is your imagination. Copy paste a tick symbol aka tick mark sign check mark checkmark for verified correct right sign from here. Positioned for explicit position of an element.

Content – The content of the box where text and images appear. Games Index Games 1 Games 2. Choose from various templates Smart Assets or Brainboxes to get started.

Starting at just 19month. Start with a square 6 x 6 15cm x 15cm origami paper. Padding – Clears an area around the content.

Go to the Data tab on the Ribbon then click Data Validation. 2 Unpack Your Box. Table for two-dimensional table data.

However do not include the header cell. To make one side of a box click on any two dots next to each other vertically or horizontally. Block for sections in a webpage.

On the Settings tab in the Allow box click List. There is no programming needed. Explanation of the different parts.

MakerCase generates box designs for laser cutters and CNC routers and outputs SVG and DXF files ready for cutting. With Buildbox creating games is simple. MakerCase Were sorry but MakerCase doesnt work properly without.

Try to make more boxes than the computer. The Flexible Box Layout Module makes it easier to design flexible responsive layout structure without using float or positioning. Check marks are used to indicate the concept yes correct and denote choiceTick symbol meaning.

You can even make your own game from scratch. The image below illustrates the box model. Then fold the right edge and the left edge into the centerline.

Design your Branded Box. Showcase your creativity and customize your boxes add your logo custom text background color upload images or even upload your own artwork. Tick symbol may get rendered as an emoji icon or a simple ASCII characterTick symbol is not actually ASCII but rather a wider Unicode character but a lot of people equate those.

Now make two mountain folds as shown. Using the mountain fold lines as guides fold the four corners of the paper into its center. If you complete a square it is yours and you get a free turn.

Flip the sheet so that the colored side is face down. Send Large Files Fast. Choose easy printing or explorative printing materials and how often you want to receive your shipment.

Read more

How To Make Cute Container

How To Make Cute Container

New Jersey architect Adam Kalkin designed and built his own house from recycled shipping containers. This is a pretty cute box all by itself.

How To Make Cute Container
Pin On Popsicle Sticks

The container has its own legs so that will work great.

How to make cute container. A used storage container costs under 1000. Once you have your design cut it out using your Cricut or other electronic cutting machine. If youre looking for a standard plastic screw top lid lip balm container they are pretty easy to find as well.

SUBSCRIBElikesharecommentguys did you like this craft video which type of videos did you like more craft videoschooseyourgiftunboxing vid. You are trying to increase the amount of space available inside the lighter. But when you open it up.

These snowman are so quick and easy to color. Plastic Lip Balm Containers. Among the many reasons to do that is durability but also price.

Use your fingers or a mini screwdriver and remove the inside pieces from the lighter. Burlap leather-laces and wood beads can be combined with pine stems for a natural outdoorsy quality. Cut a sheet of root cloth to the right size and duct tape it to the container.

This will prevent the soil from falling out and it will let water out of the bottom. Just use a blender pen and ink from the lid of your ink pad. I hope you enjoy this video.

Youll want to use Cricut Design Space and design what you want your box to say. This beauty is made out of shipping containers. Amazon sells lip balm tubes and for a bulk purchase their prices are pretty good.

Pull out any pieces inside the lighter that block storage space. Reuse and recycle cereal containers to make these homespun and handy holiday treatboxes for a cookie exchange a gift or just to share when friends come to visit. Sand down any bumpy parts within the lighter.

Mountain Rose Herbs sells 14 12 1 and 2 oz lip balm containers. You can use a knife to poke a few holes in that. Make design and cut TIME.

You can buy a personalized cut file here or skip this and the next 3 steps and buy a complete cut-out design here. Up pops a snowman from the Jolly Old St.

Read more