How To Fold Origami Chair

How To Fold Origami Chair

This origami video goes a little fast but the table and chair are really cute. Just pause the video as you go along.

How To Fold Origami Chair
How To Make An Origami Chair By Using Paper Make A Paper Chair Easy Steps Origami Chair Origami Easy Steps

Start with a 6 inch 15cm square origami paper color side down.

How to fold origami chair. Step 5 Turn the paper over. Aug 11 2016 – How to Make an Origami Chair Origami Chair Folding Instructions F2BOOK Video Tutorial 167F2book channel For Origami For Kids Learning Paper Art Instructi. Origami Chair Step 2.

See more ideas about origami chair origami origami furniture. This is the back of the paper usually white. These instructional animated slides teach you how to easily fold a paper chair Japanese style.

Learn how to fold Origami ChairSubscribe Youtube Channel. Learn how to use the Japanese art of origami to make your own paper chair. Lay it with the colored side facing down.

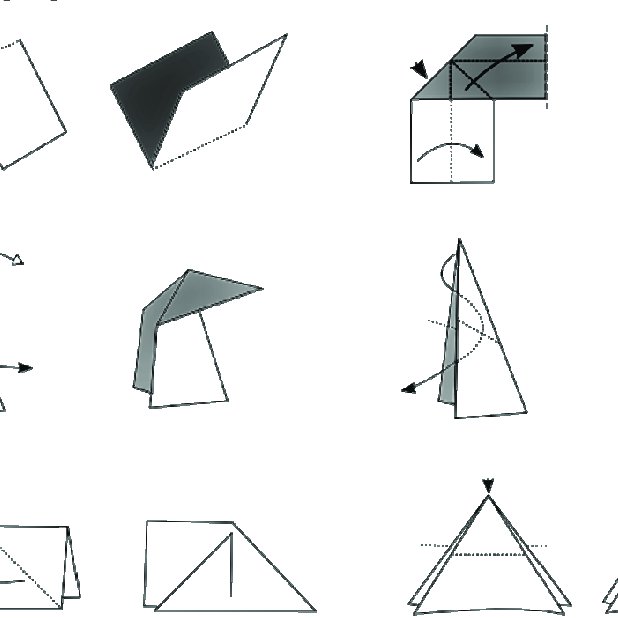
Here you will learn how to apply a chair-fold in origami. Crease well and unfold. Start with a six inch square piece of paper.

Unfold the previous step. You can also speed up the instructional origami video if it is going too slow. If you are a fan or origami this instructional video will surely satisfy your origami needs.

Fold it in half on the vertical axis. One horizontal and two vertical crease lines. Crease well and unfold.

Step 4 Fold all 4 corners to the centre of the paper one more time. Table How to fold a paper table. Step 7 Fold the top flap down to make the back of the chair and the sides and bottom down to form the base of the chair.

The chair-fold consists of three 90 valley-folds two 90 mountain-folds and two valley-folds. Origami – Table Chair Table – 2. Read on to learn how.

Take post it in your choice of color. The steps are easy to follow so anyone can fold one. This is an easy Origami chair for kids and adults to fold.

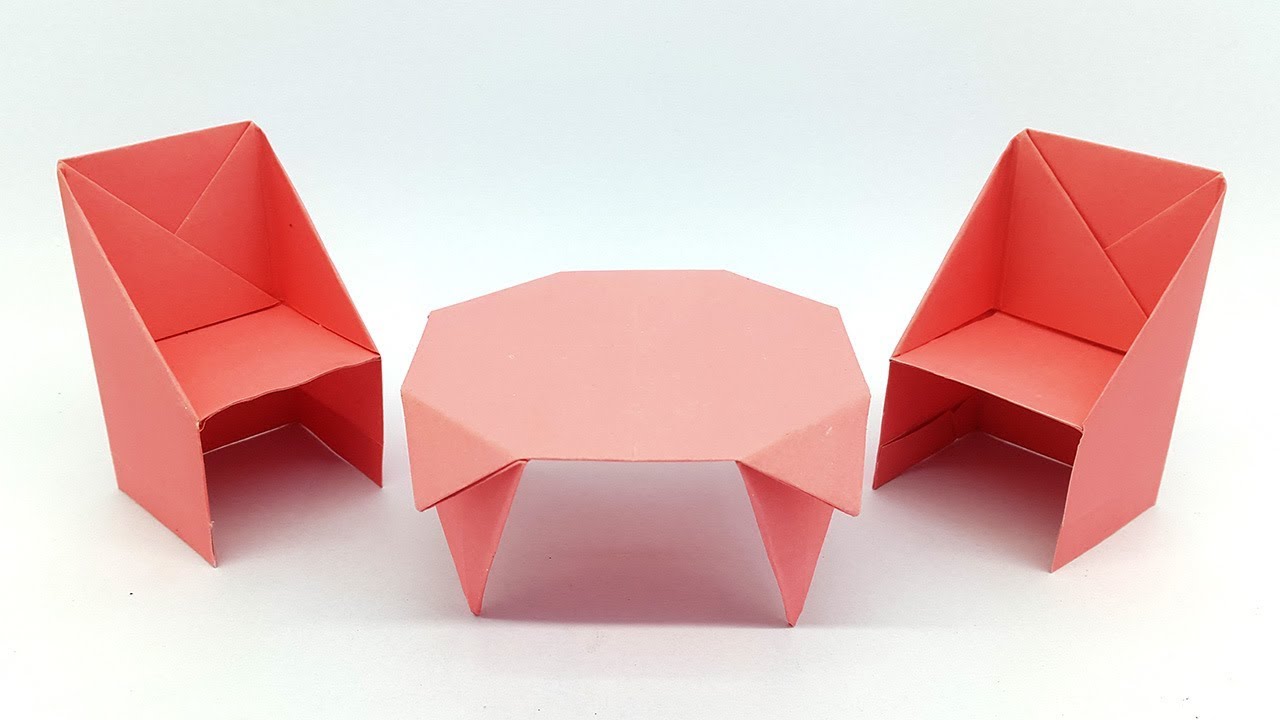
Fold it in half hot-dog style there should be two long sides and crease well. The origami tables can be used to make miniature displays or use them in a dollhouse. Learn how to make origami tables and chairs.

Chair How to fold tutorial If playback doesnt begin shortly try restarting your device. Origami Chair Step 1. Start with a six inch square piece of paper.

Fold the paper in half from right to left. Watch this origami how to video and learn how to make an origami table and chair. Oct 24 2017 – An Origami Chair can be used as for mini dolls.

Its super easy to fold and all you need is a post it note. Now fold both the right and left sides to meet the center crease. Use the start stop forward and back buttons to easily follow along.

Fold it in half diagonally so the sticky is on the inside. Post it note origami. Origami Chair Step 3.

How to fold an origami chair Paper Crafts Instructions and Diagram ORIGAMI Japan. In order to apply a chair-fold there must be three crease lines. This is Fun to use as for your origami furniture set.

Use these Chair instructions and diagrams to guide you in folding this Chair. Step 3 Fold the 4 corners behind the model to the centre of the paper. We will start off by making an origami cupboard fold.

Read more

Fold Paper Fortune Teller

Fold Paper Fortune Teller

The fortune teller was getting pretty beat up after a few days so we needed to make another one. Take the corners and fold them to the center point of the paper where all the lines cross.

Fold Paper Fortune Teller
How To Make A Fortune Teller For Kids Cool2bkids Origami Fortune Teller Fortune Teller Paper Kids Origami

Flip over the paper.

Fold Paper Fortune Teller

Fold paper fortune teller. One day Mitch came home with a folded paper fortune teller his friends mom made to entertain them during a sleepover. When used as a fortune teller a player asks a specific question and the operator goes through a series of steps to determine the questions answer which is hidden inside the paper folds. Spell out B-I-R-D while opening the fortune teller once as you say each letter.

You may not have heard of a fortune teller before but that may be because you were never a ten year old girl. Fold over the four corners evenly into the middle. Learn how to fold a fortune teller we also show you how to use one.

Artwork facing down – Start with your artwork facing down – Fold the paper in half diagonally corner to corner – Then open the paper back up – Fold all four corners into the middle so they are touching – Once you have folded all four corners into the middle – Flip your paper over so the flaps are. Crease the edge then unfold it back out. Each design is pre-printed all you have to do is color in the designs cut them out and fold along the pre-defined lines.

Fold and unfold the left edge of the square over to the right. Flip your paper over. It doesnt matter which way you fold the paper at this stage your first two fold lines are just to guide you Fold the square of paper in half -.

Instructions for folding your printable paper fortune teller. Towards the end of. To make these at home all that was needed was one blank.

Fold the paper diagonally to form a triangle. It must be a yes or no type of question such as Will I ride the colorful Star Ferry today 2. He was a little ner.

The outside part of the paper fortune teller should be on the outer part of the fold. He thought it was the Coolest Thing Ever and insisted several times to tell my fortune with it. Fold and unfold the bottom edge of the square up to the top.

Fold into fourths one last time. Ask the fortune teller a question. Fold the corner to the center of the square where the X crosses Repeat with the other three corners and youll end up with an even smaller square.

Flip over the paper the colored side or side with the fortune teller design should face the table. You can tear off any excess if you dont have scissors. Fold over the corners on the new side of the paper.

A folded paper fortune teller ready for play How To Play. Jan 5 2014 – Free Retro Paper Fortune Teller TemplatesWith so many toys and games for children around these days its easy to forget the simple pastimes of our own childhood created using things that wed find around our homesOne of our favourites was Paper Fortune Tellers. Pick a corner such as bird 3.

So when my origami loving nephew decided he was tired of making Kusudama flowers. Fold the square of paper in half and unfold. Now fold and unfold the square in half both ways.

Repeat with the other side. Flip the paper over. Cut neatly along the dotted lines indicated around the outside edge of the fortune teller.

How to Make a Paper Fortune Teller. Boys may have been into them to but honestly I was too busy playing with my fortune teller or learning that Id be living with Paulie Shore and 7 little Paulies in a shack while playing a game of MASH. Do the same with the other 3.

This will ensure that the fortune teller will work. A sheet of printer paper works perfectly. Use scissors to cut along the border of the template blank or pre-filled leaving you with a square shaped piece of paper.

Fold the paper into fourths. Fold the top right corner into the bottom left corner to create a triangle shape. All you need to make one is a sheet of paper any size.

Unfold and then fold diagonally the other way. So that the creases look like an astrix across your. Start folding bring one of the corners to the center of the paper.

Filled with 30 fun fortune teller designs this origami fortune teller book will amaze both you and your friends. Also let Chuckers know how well he taught this one in the comments. An easy to read introduction guide explains how to use each fortune telling cootie catcher.

Fold into fourths again. How to fold play with a paper fortune teller. Fit your fingers into the slits and open.

Read more

What Does Valley Fold Mean

What Does Valley Fold Mean

Go straight for colorbond. Another way to say this is the valley of the scored line should be on the outside of your card.

What Does Valley Fold Mean
Valley Mountain Folds British Origami Society

This type of arrow can be used with a valley fold or a mountain fold.

What does valley fold mean. Whether youre an. Keep scrolling for more. The valley fold is the exact opposite of a mountain fold.

For the mountain fold the middle goes up and for the valley fold the middle goes down. I also regularly post time lapses of the process of folding complex origami figures. Valley fold and unfold the flap which is to be squashed.

It will need the spacious fold on the bosom to contain it ROSENMULLER. A score line or channel line creates two distinct sides of a card. Some origami artists use an open arrow-head letter V instead of a triangle.

I will repay their sin so abundantly that the hand will not be able to receive it. Dont forget my wax paper tip also when. In other words folding in half.

As a printing term scoring paper is a way of preparing a sheet of paper so that it folds cleanly. When properly folded cards will have a cleaner more even fold with less chance of cracking. To make a crimp fold simply fold the paper in half from top to bottom.

This could be animals action models dinosaurs boxes geometric shapes and much more. Most valleys are formed by erosion of the land surface by rivers or streams over a very long period of time. Having two parts or aspects.

In origami we often fold one edge to meet another edge as shown here. A valley is an elongated low area often running between hills or mountains which will typically contain a river or stream running from one end to the other. This allows for the paper to fold easily without cracking shifting or otherwise looking ugly.

The most basic types of folds are anticlines and synclines. It does not make sense to have to spend money to change valleys too often. One side has a recess or indentation the other side has a bump or raise.

An arrow with half an arrow-head which is hollow it is white or not filled is used to show directionality in mountain folds. Lift the flap that is to be squashed towards you. The most basic origami technique is the valley fold.

Sometimes there is an arrow showing the folding direction. It is often more economical to install a colorbond valley at the very start and have the life of your valley increased by another 10 years So do not even consider a galvanised or a zincalume finish metal valley. Fold part of the paper towards you and crease along the dashed line.

Other Words from twofold Synonyms Example Sentences Learn More About twofold. When to change a valley. This is the type of fold that everyone does whether or not they realise it.

Our Simply Scored tool will help you get precise score lines every time. The proper way is to fold into the raised side. If you pick up the paper youll be able to see the pleat.

Basically a crease-line is pressed or embossed into the paper at the folding point. Being twice as great or as many. In terms of geologic structures the up folds are called anticlines and the down folds.

This pre-creases the paper prior to squashing. When you score cardstock you are actually stretching the fibers in the paper which means you want to fold AWAY from the score line. Imagine a rug the sides of which have been pushed toward each other forming ridges and valleys the ridges are up folds and the valleys are down folds.

The sense thus is. The valley fold gets its name because if you unfold. Try to make the edges or other reference points line up exactly except if the diagrams tell you to leave a gap.

A zig-zag arrow or a double headed arrow indicate fold and unfold. The Orientals used the loose fold of the garment falling on the bosom or lap as a receptacle for carrying things. The valley fold is shown by a dashed line.

Some valleys are formed through erosion by glacial iceThese glaciers may remain present in valleys in high mountain or polar areas. Fold the front flap back to the right leaving a gap. The arrow in the first image indicates were taking the lower edge to the opposite edge.

Pry apart the layers of paper.

Read more

Fold A Paper Dart

Fold A Paper Dart

Cut several rectangles out of plain paper. 10308 538 PM.

Fold A Paper Dart
Dart Paper Airplane Paper Airplanes Origami Airplane Make A Paper Airplane

Just fold the paper back and forth an.

Fold a paper dart. The first and most important fold all fold are important so measure twice fold once and sharply crease it First fold the paper top to bottom. Paper Darts That Hurt. You can make as many darts.

Each piece of paper will make one dart. Watch this instructional paper craft video to fold a paper airplane called the Safe-T Dart. The paper needs to be square or else your dart wont work properly.

Ive received lots of requests for this design recently so I decided to put together this quick tutorial. This is an intermediate origami project. Folding is the most important step.

With a good throw Stingray can fly over 100 feetJoshs YouTube. This will determine the firmness and shape of the wasp. The rectangles need to be about 1 inch 254 centimeters wide and 2 to 3 inches 508 to 762 centimeters long.

This is an intermediate origami project. For instance a 3 by 3 in 76 by 76 cm sticky note works well for this. They are sharp at the tip so be careful not to throw it anyones face and make sure it hits their skin.

The bulldog dart paper airplane. Do you think the Safe-T Dart looks like a duck in. If its your kids first time making a real paper airplane this is a good place to start.

This is the probably the most iconic paper airplane design and its one of the easiest to fold. You can almost fly the shuttle dart to the moon. Its super easy to fold and all you need is a Post-it Note.

The Classic Dart is probably the easiest paper airplane in the world. Fold a safe-T dart paper airplane. The lock-nose dart is a simple yet sophisticated paper plane.

This is an intermediate origami project. The shuttle dart airplane is an accurate long distance flyer. Press and slide your finger along the fold to create an obvious horizontal crease along the paper.

This paper airplane is a warm-up of sorts. The lock-nose dart is a championship flyer. Watch this instructional paper craft video to fold a paper airplane called the lock-nose dart.

Check out this video to learn how to fold a classic paper airplane that flies awesome. Watch this instructional paper craft video to fold a paper airplane called the shuttle dart. How ToFold a safe-T dart paper airplane.

The Safe-T Dart is a good slow flyer. First you fold the paper in half lengthwise and then unfold. If you dont know how to fold it its definitely time to learnGet your own PowerUp Mo.

Hamburger stylepic 1 Then fold again left to right. Its just not going to win you any contests or style points. Fold a shuttle dart paper airplane.

Pic 3 After this is done rotate it to the right. The bulldog dart paper airplane is one of my favorites because its an. You can either do this with a whole sheet of paper but i prefer making 4 with one paper.

Basic Dart A basic design with decent distance and speed. Its simple requires few folds and flies well. Pic 2 Then fold again top to bottom.

In this video you will learn how to make a paper dart from a sticky note. You will need one piece of origami paper to complete this paper craft plane.

Read more

Reverse Fold

Reverse Fold

Some paperfolders call this a hood-fold. Inside reverse-fold is always applied to a folded corner flap.

Reverse Fold
This Is The Gallery Of Lukasheva Ekaterina Paper Art I Adore Modular Origami Technique Kusudamas And Papercraft Geometric Object Modular Origami Basic Origami

When you want foldr to reverse the list you need a stick the left.

Reverse fold. Now this sounds rather more complicated than it actually is. The origami outside reverse fold is a technique that is often used in origami. This fold changes the direction of the paper.

Step 9 Fold the bottom of the top layer of paper underneath along the dotted line. Outside reverse folds are very common especially when making the head or a tail of origami animals. Similar to the inside reverse fold the outside reverse fold is very easy to do understanding this basic origami folding technique will help you a lot when starting out with origami.

It refers to how the paper is sometimes folded in one direction to make a crease so that it can be folded in the opposite direction to achieve the desired result. Step 5 Fold the paper in half. 47 rows On finite lists that means that left-fold and reverse can be composed to perform.

For β-hairpins with reverse-sequences that fail to fold we employ a simple mutational strategy for guiding stable hairpin formation that involves the insertion of amino acids into the β-turn. The origami inside reverse fold is a technique that is often used in origami. In origami the inside reverse fold is shown with.

Reverse Fold Regina SK. It is used regularly when making the head of a bird or the feet of an animal. The most common is an inside reverse fold.

Welcome to The Reverse Fold. The Reverse Arm-Fold trope as used in popular culture. Reverse folds of a corner are typically used to produce feet or birds heads.

A mountain fold line dash-dot-dot line a broad arrow push in action and a closed black arrow indicating directionality. Inside Reverse Fold The Inside Reverse Fold is commonly seen in the making of origami birds. Step 10 Fold the right side of the paper over.

A reverse fold is where a tip is folded so that ends of the paper lie in between different layers so that two or more layers are folded along a single crease. In origami the outside reverse fold is shown with a valley fold line dashed line a closed black arrow denotes valley fold and an open white arrow denotes mountain fold. I learned the origami method of folding a paper crane three months ago but only after many failed attempts.

Inside reverse folds are very common especially when making the head or a tail of an origami bird or other animal. In particular the head or feet are made by executing these series of moves. This technique is being frequently used for many origami models.

Reverse fold is a term used in origami. It is commonly used in making the head of a bird or the feet of animals. The Outside Reverse Fold is commonly seen in the making of origami animals.

Similar to the outside reverse fold the inside reverse fold is very easy to do and understanding this basic origami folding technique will help you immensely. The physical inverse of the Badass Arm-Fold where the arms are folded behind the back. The sink fold is considered an intermediary to high skill.

Step 6 Make an Inside Reverse Fold along the dotted line. Step 8 Fold the top of the paper down along the dotted line. Check out our reverse nose fold selection for the very best in unique or custom handmade pieces from our nose rings studs shops.

This basic origami move allows the model to be more stable and secure so it does not unravel by itself. Step 7 Open up the paper by folding along the dotted line. In particular the head of the bird is often folded-in so it is sandwiched in between outer layers of paper.

Reverse foldl flip this is the same as your version but using built-in functions. This fold allows the paper to change directions. The version shown here is called an open sink and there is another version called a closed sink which generates a triangular pocket with no flaps showing.

Origami Jewelry and various artwork created by Canadian artists Heather and Christine Howell. It reverses the face of the corner flap to show the inside of the flap. The result is similar to that of an inside reverse fold.

However the difference is that in the outside reverse fold the paper wraps around the model on the outside of the model. There are two sorts of reverse fold.

Read more

How To Fold An Origami Crane

How To Fold An Origami Crane

Using the creases you have made Bring the top 3 corners of the model down to the bottom corner. This step is preparation for the next step.

How To Fold An Origami Crane
Origami Crane Step By Step Origami Crane Tutorial Origami Paper Crane Origami Crane

Follow along and learn how to make a paper crane with the step-by-step origami crane instruction video below.

How to fold an origami crane. Turn the paper over to the white side. Grab the left and right side of the flap and open it up. Now you know how to make an origami swan.

How to Fold an Origami Crane Fold in the dotted lines to meet the center line Fold backward in the dotted lines Fold in half Fold in half Open and flatten the pocket like Fig5 Fold and flatten the pocket like Fig8 9 Flatten Turn over Turn over Finished Open the pocket from Make creases and fold back Pocket fold Pocket fold the head and open. My son and I took on what seemed like a simple project. Fold one origami crane every day during the pandemic.

Fold top triangular flaps into the centre and unfold 8. This is the back of the paper usually white. It takes a looooong time to fold 1000.

Fold the bottom up to the bottom of the previous fold and crease with yor nail. Together we discovered over the. Take both sides of the top layer and fold them in to meet at the middle then unfold.

Be in it for the long haul. You can make a swivel fold on many different shapes but this one is easy to demonstrate. Fold Paper Into a Square.

To begin we will fold a squarepreliminary base. Ripcut off this excess piece. Fold the paper in half crease well and open and then fold again in the other direction 3.

If you have lined paper grab the right hand corner of your paper and fold it to the left hand side as shown. Crease the sides so you can fold the top corner down to the bottom. Consider playing some quiet music from Japan in the background itunes or pandora are nice sources.

The paper doesnt have to be special origami paper but it needs to be a square. Fold the bottom edge up to. Step 1 Start off with a Square Base that has one of the four flaps Squash Folded.

All you need is a square piece of paper in a bright color or pattern if youd like. Tips from the Spencer-Bergs on starting a crane project and folding origami. The Swivel Fold comes up a lot in origami and is somewhat similar to the Petal Fold Variation.

This is the front of the paper crane will end up this color.

Read more

How To Fold Origami Dragon

How To Fold Origami Dragon

Take the two sections in the middle from the tears in step 8 and folds in step 14 and fold them so that they are at right angles to the body of the dragon. 43 Mathematically-Based Models From Simple to.

How To Fold Origami Dragon
Simple Origami Dragon Easy Origami Dragon Origami Dragon Instructions Origami Dragon

Fold the front flaps at the bottom backwardsFold those in half downwards making the front feet.

How to fold origami dragon. Join two opposite corners and flatten to obtain a square. Once folding is done make a proper crease by putting finger pressure on. Fold either side up making an inside reverse fold.

Expertly folded and I love how it kind of feels playful. How to make an origami dragon. A 10 square will fold into a 6 dragon but I recommend using a larger sheet if available.

After the first fold open the paper and similarly fold it from the other side. These are the dragons arms. It starts with the traditional birdbase and just adds a few creases for a really cool dragon.

Fold the piece of paper into half on both diagonals and open it again each time. Free tutorial with pictures on how to fold an origami character in under 90 minutes by paper folding with scissors origami and stapling machine. Turn it over fold it vertically and horizontally and open it again.

Apply the same technique again establishing the length of the neck and creating the head. My favourite origami. Inspired by creatures and dragon.

This Dragon is a two-colored model when folded from a standard sheet of origami paper. Add Tip Ask Question Comment Download Step 1. The model is intermediate so if you are new to folding maybe you want to try something simpler like the crane first.

Start with the white side up to fold a white dragon with colored head and wings or the colored side up to make a colored body with white head and wings. Diagrams available in Genuine Origami. 71111 1017 AM.

I uploaded a video a few days go on how to make an origami dragon and here are the requested instructions. Here you can see a center crease. Turn over the piece of paper and now fold it horizontally and vertically and open it again.

Robert Segundo has been an artist since he could hold a pencil. The Dragon is a really neat Model by Robert Bob Neal. 7 Eastern Dragon Designed by Jun Maekawa and Folded by Andrea Borsa.

The origami technique for folding a dragon is very similar to that of the crane. Comment réaliser cet origami de dragon. This may just be one of the coolest origami folding projects weve ever come across at Wonder How To.

First of all fold you piece of paper on both diagonals and open it again. Fold this tip back again creating the head and the dragons horn. Then make a proper crease on the folding.

Making Second Folding to Create Origami Dragon. Another somewhat simpler design but nonetheless fantastic looking. Make an origami dragon with paper folding instructions from a graphic artist in this free video on Japanese origami.

How To posted by Miss Sixty. He is also an Origami wizard. Now you can join two opposite corners and flatten to make a little square.

Take one small sheet of origami paper and then fold the paper diagonally. Fold a very advanced origami fiery dragon. Yeah it looks almost impossible to fold and super complex but if youre an advanced origami folder then this project will be fun to attempt.

Read more

How To Fold A Paper In Half Perfectly

How To Fold A Paper In Half Perfectly

Photo upper left Then fold it in half in the other direction to locate the center point. Here is a simple trick how to cut a large piece of paper or cardboard into two perfectly symmetrical halves.

How To Fold A Paper In Half Perfectly
Crane Photo This Photo Was Uploaded By Melthegrotesque Find Other Crane Pictures And Origami Paper Crane Origami Instructions Crane Paper Crane Instructions

Next you fold the top down and crease that fold also.

How to fold a paper in half perfectly. The answer is simple. Roll out as much paper as you can. Ever wanted to know how to fold paper.

Folding the paper in half a third time will get you about the thickness of a nail. Photo by Ross Millikan below – if the image helped you you can up-vote his too. This isnt part of the Outside Reverse Fold but it will give us a shape we can use to demonstrate the fold.

When you fold it in half you divide the length in half and double the thickness 150 mm and 1 mm respectively. Open the sheet so its flat. Using the paper folding formula W π t 2 3 n 1 2 where W is the width of a square piece of paper n is the number of folds and t is the thickness we find that the width of the paper would have to be 005 π 2 3 100 1 2 mm wide to be foldable 100 times.

To mail you must place the lettehead head down face forward into the envelope. That usually results in folding a sheet of paper perfectly in half. Position your paper so that the half fold you just made goes from left to right.

Hold the paper lengthwise and fold it in half side to side. When you perfectly fold the paper in half you will double its thickness. Step 2 Fold the paper along the dotted line.

PerfectlyToday I will show you exactly how to do it. Then crease the fold. To fold the letter correctly you must take the bottom 13 of the letter and fold it upwards towards the letterhead – it should be folded about halfway to the top.

A piece of letter-size paper folded in half makes a card thats sized 425 inches by 55 inches. Lift the other edge of the piece of paper about one inch off of the folding surface. Align the center-mark sheet directly above the second sheet.

Step 1 Start with a square of paper white side up and fold it in half diagonally. Enjoy Tell me what simple things you would like to see next. Be careful not to rip it Carefully pull that corner over to the opposite side of the paper.

A regular piece of paper is about 300 mm long and 05 mm thick. 10 folds and the paper will be about the width of a hand. Now sharpen the fold.

Paper folded 7 times will provide you a thick notebook of 128 pages. The 30 folding can lead you to the space. Carefully fold the sheet exactly in half in one direction.

A piece of letter-size paper folded in half makes a single portrait card that measures 85 inches by 55 inches. Fold along the line through the top corner and the third of these marks. How to Perfectly Fold Paper – YouTube.

Use a book or the handles of your scissors. At the 23rd folding you will get the paper stack of a kilometer height. As your folding continues you make the paper shorter but thicker making it harder and harder to achieve a fold.

The average paper thickness in 110th of a millimeter 00039 inches If you perfectly fold the paper in half you will double its thickness. Use a straight edge to carefully draw a line from the bottom left to the point where the fold in the middle meets the right edge of the paper. Straighten out the paper again.

Hold one edge of the paper onto the folding surface firmly but without damaging it. Fold it 10 times and the thickness will be over the palm width. Seven folds will be about the thickness of a notebook of 128 pages.

Seven folds will be about the thickness. Fold twice to obtain quarter markings at the paper bottom. If you perfectly fold it in half its thickness will double.

Straighten the folded piece of paper. Keep folding the paper in half in this way until you cant fold it in half any more. Make sure that the open side matches perfectly.

Make sure the corners line up. The vertical lines through the first two marks intersect this inclined line at thirds which allows the final foldings. Put some weights on them to keep them in place.

Now take the folded end of the paper and bring it to the open ends of the length of paper. 23 folds will get you to one kilometre. Line up the top edge with the bottom edge exactly before you crease and be mindful of keeping them lined up as you deepen the crease.

Draw a line from the bottom left to the right side of the half-fold. Take one end of the paper and bring it back to the other end. Folding the paper in half a third time will get you about the thickness of a nail.

Read more

Fold Paper Into Box

Fold Paper Into Box

Open out the top and bottom triangle flaps 6. Cut along creases on the shorter ends of the paper to the first place where two creases meet.

Fold Paper Into Box
How To Fold A Paper Box Paper Crafts Origami Paper Crafts Paper Box

Rotate model then repeat 5-8 on other end of model.

Fold paper into box. It should be like the whole paper is divided into four squares with the lines intersecting each other. I folded this plate into a box because I had no phone to occupy my time. Fold up and tuck under.

Origami Box Instructions 1. Lift the first layer with 1 hand and place the other hand on the inside holding the remaining layer down as shown in. Fold the top triangle of paper up a little bit to also fit into the bottom of the box just like in step 19.

Fold the paper in half. Step 21 Fold the top flap of paper down along the dotted line to form the edge of the box. Do not cut the center fold Fold the end rectangles together to form sides of the box and glue together.

Fold the top and bottom of this square into the center and open out again to create these creases. Fold up and tuck under. They dont fold flat.

Then fold the right edge and the left edge into. Draw two lines diagonally from corner to corner using your pencil and ruler. It is very possible to fold a round paper plate into a square box.

Start with a square piece of paper. And I am xeroxing the box because I have no phone to photograph the box. Youll start by making the lid and then youll repeat the process with a slightly smaller square of paper to make the base of the box.

Fold the paper in half and make a crease in the middle. Free tutorial with pictures on how to fold an origami box in under 5 minutes by paper folding and paper folding with nails. Finished Rectangle BoxYou can also make slightly larger box for a lid.

If you want to fold a lid for your box. Most board games such as a Monopoly box or a traditional two-piece shoe box are setup boxes the boxes are already erected or set up and they usually consist of the box. Make a crease along the line and unfold.

Now make two mountain folds as shown. White side up Fold the paper in half horizontally and then verically so the creases look like this. Fold down top corner.

The answer is yes. Fold the paper in half again on the other side. Begin with one sheet of square paper.

Flip the sheet so that the colored side is face down. Start with a square 6 x 6 15cm x 15cm origami paper. Learn to make other boxes like the origami rectangle box.

Mark the Center of the Paper. Flip the paper over and make sure the corner with the 2 loose corners is facing you. Setup boxes also known as rigid boxes In contrast to folding cartons setup boxes are a rigid box.

This is always the most basic step in making a paper box. The competed traditional origami box or masu box. Your nine-inch paper plate will transform into a two-inch box.

Fold up the remaining two ends and glue as you did for the box. How To posted by K. Fold the paper into 16 rectangles as you did before.

Using the mountain fold lines as guides fold the four corners of the paper into its center.

Read more

Santa Fold Hat

Santa Fold Hat

All of these characteristics result from the materials used to weave the hat. The middle will be your point.

Santa Fold Hat
Santa S Face Picfish Blogspot Com Origami Santa Christmas Origami Origami Xmas Star

Lets start with Santa hat crafts for the kids to make.

Santa fold hat. Fold the circle in half and cut along the fold. The host or hostess of this family gathering is left not only with the task of preparing the meal but also with decorating the dinner table in the most festive and Merry Christmassy manner. Find 25 Easy Christmas Crafts for Kids Here.

Fold the top corner down leaving a small gap between Santas hat and his beard. Artisans in Ecuador carefully weave these straws into our Genuine Panama HatsPanama Hat quality is measured by the tightness of this mesh the higher the number of weaves per square inch. There are four sheets to the printable.

Step 11 Fold the paper up along the dotted line. Iris folded Santa hat. Make Santas Hat and Beard.

The third and fourth sheet are for the hat. How To Make A Santa Hat Out Of Paper. Use the pattern provided and enlarge it on your computer or use a triangle according to the listed measurements to make your Santa.

Fold a paper towel into a 4-inch square and lay it on a saucer. Check out these simple Santa crafts for kids to make. Step 14 Fold the paper down and behind along the dotted line.

Fold another small section down creating Santas mustache. You can create this Santa hat in about a half-hour at home with your sewing machine. Santa Fluffy Hat Applique design for machine embroidery shown with our Cinnamon Cake font NOT Included INSTANT DOWNLOAD.

A traditional hat in the Philippines. Santas hat is a classic but a focus on his beard can be swirly fun too. Print the first two sheets beard moustache and hat trimmings onto white paper.

Step 12 Fold the bottom of the paper underneath. Yeager sent the photos to Hugh Hefner who offered her 10000 for the image. Spread the powdered sugar mixture on top of the towel on the saucer.

The first photos Yeager took of Page showed the model nude in Yeagers family home beneath a Christmas tree in Santa cap. Classic Santa Hat Crafts for Kids to Make. What did you think about this origami Santa hat.

5 out of 5 stars. Step 13 Turn the paper over. Making a Santa hat for holiday festivities is an easy project requiring moderate sewing-machine skills.

This listing is for the book folding pattern Santa hat You will need a hardback book with 310 pages 155 folds it is central in 20cm a pencil and a ruler. Commonly used by college and high-school marching bands. Origami Using Money Origami Love Origami Design Origami Stars Snowflake Origami Origami Envelope Easy Origami Easy Gift Envelope Origami Paper.

A tall cylindrical military cap usually with a visor badge and plume. Hold the half circle with the flat side facing up. Fold the bottom right corner up to the top corner.

We had a tiny opening at the top and pulled a piece of string through it making a loop to. You can print them straight onto red paper like we have or print them onto white paper. These are quite simple technics recommended for kids also.

Flip the paper over to the other side. Spread coconut in a shallow layer on another saucer. A fur hat worn by married Hassidic men on Shabbat and holidays.

Dip the rim of a Martini glass in the sugar mixture on the towel until the. The top of Santas hat. Step 10 Fold the other side of the paper over like in step 8.

Saved by Mark Rounds. The Panama Hat Panama Hats are famous worldwide for their lightness durability flexibility and comfort. Bring the two ends together.

Saved by Helen Boice. The complete Santa hat. Christmas Card Template Christmas Cards To Make Christmas Paper Xmas Cards Holiday Cards Handmade Christmas Crochet Christmas Christmas Bells Christmas Angels.

A floppy pointed red hat trimmed in white fur traditionally associated with Christmas. Top 10 Christmas Napkin Folding Tutorials Just like every family holiday the close and extended family members gather for the traditional Christmas dinner. 1 Download and print your Santa Hat Craft Template.

How to fold a Money Origami Elf Santa Claus from a dollar bill. The shoot established a working relationship between the pair that defined both womens careers and raised their profiles significantly. This is a step by step how to make Christmas napkin folding tutorial from cloth.

Read more